Moving the Cursor Point in Word
The text you type appears wherever the insertion/cursor point is positioned in the current document. Moving the insertion point around the screen is a critical part of creating and editing documents. To move the insertion point around the screen, you can use either the keyboard or the mouse. Table 1-1 lists ways to move the insertion point by using keystrokes.
For more on Microsoft Word classes in Los Angeles call us on 888.815.0604.
To use the mouse to move the insertion point, first position the desired section of text in the document window by using the scroll bars. Then, position the mouse pointer in the desired location and click the left mouse button. If you are using a Microsoft IntelliMouse, you can display and move the insertion point to a different part of the document by using the wheel button.
Do not use the Enter key to move the insertion point unless you want to add hard returns, or blank lines, to your document. If, however, you want to move the insertion point to an area of your document into which you have not yet entered text, you need to press the Enter key until the insertion point is positioned in the desired location.
| Keystroke | Result |
| Up, Down, Left, or Right Arrow | Moves the insertion point to the previous or next line or character. |
| Page Up | Moves the insertion point up one screen. |
| Page Down | Moves the insertion point down one screen. |
| Home | Moves the insertion point to the beginning of the current line. |
| End | Moves the insertion point to the end of the current line. |
| Ctrl+Home | Moves the insertion point to the beginning of the document. |
| Ctrl+End | Moves the insertion point to the end of the document. |
| Ctrl+ Page Down | Moves the insertion point to the top of the next page. |
| Ctrl+Page Up | Moves the insertion point to the top of the previous page. |
Table 1-1: Moving the Insertion Point by Using Keystrokes

You can also use Word’s Find feature to help you move the insertion point. Instead of scrolling or paging through the document to find occurrences of specific text, you can have Word perform the search by defining the desired text on the Find and Replace dialog box’s Find tab. Figure 1-4 illustrates the Find tab. Finding is not limited to letters and numbers; you can search for a phrase, including punctuation and spaces, as well.
When Word finds the desired text in the document, it highlights the text, suspends the search, and leaves the Find and Replace dialog box open. You can then place the insertion point at the found text, move to the next occurrence of the text, or end the search. If the text cannot be found in the current document, Word displays a message box indicating the text does not appear in the document.
In Word 2013 the find option also activates the Navigation Pane to search within a documents.
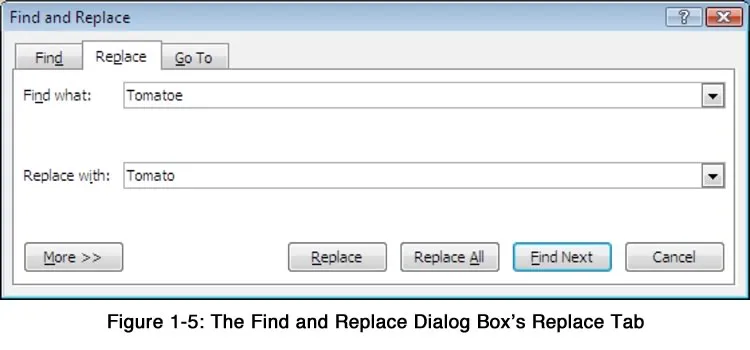
The Replace option helps to replace the particular word selected or it changes the particular word throughout the document. This feature saves our time in searching the word and replacing one by one.
Method
To move the insertion point using the keyboard:
- Press the appropriate directional arrow, key, or keystroke combination.
To move the insertion point using the mouse:
- Position the mouse pointer at the desired location in the document.
- Click the left mouse button.
To move the insertion point using the Find feature:
- On the Editing group on the Home ribbon tab, choose Find.
- In the Find and Replace dialog box, make sure the Find tab is selected.
- On the Find tab, in the Find what text box, type the desired word or phrase.
- Choose Find Next to find the next occurrence of the text.
- Repeat step 4 as required. or
- In the information box, choose OK. or
- In the Find and Replace dialog box, choose Cancel.
- If the desired text is found, in the document, click the highlighted text.
Exercise
In the following exercise, you will move the insertion point.
- Make sure Regional Information is open in the current window
- Press Ctrl+End. [The insertion point moves to the end of the document].
- Press Ctrl+Page Up until you reach the top of the document. [The insertion point moves to the top of each page as you move up through the document.]
- At the top of the document, position the mouse pointer at the beginning of the first paragraph (beginning with In addition to).
- Click the mouse button. [The insertion point is placed at the beginning of the paragraph].
- Press the Down Arrow key as many times as necessary to move to the beginning of the second paragraph (beginning with Syon House). [The insertion point moves to the new location].
- Press the Right Arrow key as many times as necessary to move the insertion point to the beginning of the word park.
- Press Home. [The insertion point moves to the beginning of the line].
- Press End. [The insertion point moves to the end of the line].
- Press Page Down. [The insertion point moves down one screen].
- Press Ctrl+Home. [The insertion point moves down one screen].
- The Editing group on the Home ribbon tab, choose Find. [The Find and Replace dialog box appears].
- In the Find and Replace dialog box, make sure the Find tab is selected.
- On the Find tab, in the Find what text box, type London.
- Choose Find Next. [Word locates the first occurrence of the phrase London and highlights it in the document].
- Choose Find Next. [Word locates the next occurrence of the phrase London and highlights it in the document.]
