How to Create & Edit Text in Adobe Premiere 2020 Part 1
By Kristian Gabriel, Adobe ACI
It has been a few years since Adobe has re-designed the way text is created and modified in Adobe Premiere. The new method of creating text is more intuitive and has much better integration than ever before. Previous versions treated text like they were separate, individual video clips that could then be loaded into your source monitor and then cut into the timeline and this had its benefits but the newer method(s) definitely take things to the next level. Just in case you are a hardened fan of the “old” way of creating text, the original text editor still exists though it has been relocated!
Need to learn Premiere Pro and After Effects? Our Adobe certified Premiere Pro classes in Los Angeles are the best and fastest way to learn. We run public classes in Los Angeles, online classes and onsite classes across the country. Obtain a quote for onsite Premiere Pro training.
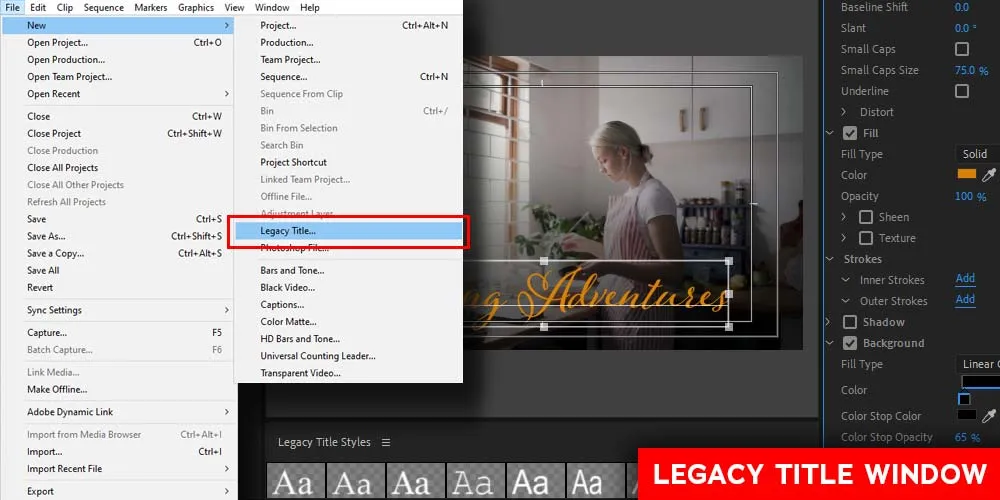
To access the Legacy Titler from within Premiere, go to File > New > Legacy Title. Just like the original titler, a window that allows you to define the size of your title sequence will appear. By default, this will be the current size of your most recent sequence. After confirming the size and pressing OK, the Legacy Title Window will appear, allowing you to create your title and add shapes and text effects. Just note that if you are using Premiere for the first time, when you press OK and confirm the completion of your title, it will not be added to your timeline. Instead, a clip of the title is added to your most recently opened bin. As a clip you will then be able to drag the clip into your Source Monitor or directly into the Timeline.
OUT WITH THE OLD, IN WITH THE NEW
The new method of creating text within Premiere should be remarkably familiar to anyone who has ever used Adobe Photoshop, Adobe Illustrator, or any other graphic design software out there. To create new text, go to the Tool Panel. This is usually located to the left of your Timeline in the Default Editing Workspace but can be in other positions in other workspaces.

Once you locate the Tool Panel, select the Type Tool at the bottom of this panel and Left Click directly into Premiere’s Program Monitor. When the red box appears, start typing. This known as Point Type. Pick a point and just click. This style of text creation is primarily for single words, multiple words, a sentence, or any text that you wish to create without the confines of a text box. Titles, Lower Thirds, Title Credits, Rolling Credits, Watermarks are all wonderful uses for Point Type. The other way to use the Type Tool is to Left Click and Drag a text box. This is known as Area Type. Area Type is primarily for paragraphs and text that needs to wrap within the confines of a box or shape.

The question is how do you edit your text once you have finished typing? This is less intuitive but easy to resolve. To change the font, font color or perhaps even to add a drop shadow, you need to bring up the Essential Graphics Panel. This panel is accessed by changing the workspace to Graphics in the Workspace Bar at the top of your Premiere interface. This can also be accessed by going Window > Workspaces > Graphics or Window > Essential Graphics. Each method of accessing the panel has slight variations but all are the same in that they allow easy access to this amazing all-in-one text and object editing panel. When the panel appears, usually to the right of your interface, you might not immediately see all the text formatting and editing functions. The reason for this is that by default, you will be in the on the Browse Tab located at the top of the Essential Graphics Panel. With your text selected in the Program Monitor, click on the Edit Tab. You should now see all your controls. If not, double-check that the text in your Program monitor is select either with the Type Tool or the Move Tool. To make things easier to learn, the entire panel can be broken down into two sections.
The top section is primarily for managing objects. An object can be a shape or graphic, but it can also be a line of text. At the very top of the panel, you can manage your objects on a layer by layer basis. Layers can be created and re-arranged above or below one another to prioritize one in front of another. An example would be if you created a rectangle layer and an additional layer composed of text. If you dragged the text layer above the rectangle layer, the text would be visible in front of the rectangle. If the rectangle layer was above the text layer, the shape may obstruct or hide a portion or all the text
Below the layer section is a feature called Responsive Design. This will be explained more in Part 2 of this article but Responsive Design – Time and Responsive Design – Position can help to adjust content easier when using keyframed content.
Directly under Responsive Design is the Align and Transform section. Whatever layer is selected can be aligned in various ways (horizontal center, vertical center, align top, align bottom, etc.). If three (3) or more objects are selected, there are also Distribution controls to aid in getting precise spacing between all of them. There are also the classic transform properties such as Position, Scale, Anchor Point, Rotation and Opacity.

The bottom section of the Graphics Essential panel is for directly formatting text. Once text has been created, you can use this section to change the font type, font fill, stroke color, background, shadow and more. Once you have sufficiently stylized your text the way you want, and you wish to add the same style to other text objects, you can save the custom style as a Master Style. Near the center of the Graphics Essentials Panel is the Master Styles drop down menu. Here you will be able to create, delete and manage styles so you do not have to recreate or format your text from scratch every time you create new text.
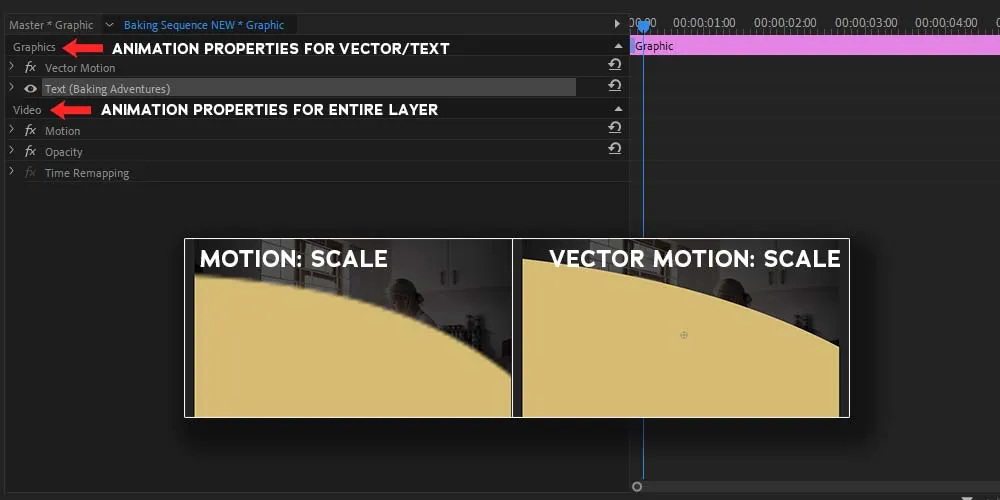
The Graphics Essential Panel is amazing but there is another powerful way to edit your text. Enter the Effects Control Panel. This panel typically holds all the controls for any effects or transitions in your timeline. When text is created and selected, new text focused categories will appear with controls to manipulate and even animate the text. Once of these new categories of properties is called the Vector Motion properties. This is especially important because the controls here will produce higher quality vector scaling and manipulating versus using the standard transform properties a little further down the Effects Control Panel.
So, where should you edit your text? The Graphics Essentials Panel or Effects Controls. Both allow you to edit and animate text, but the Effects Control Panel gives you more control over animation giving more professional looking behaviors and so much more. Even though you can perform some animation in the Graphics Essentials Panel, it is only for the simplest of animations. The Effects Controls gives you total control and access to your keyframes.
ESSENTIAL GRAPHICS PANEL PROS & CONS |
|
Ease of Use |
PRO! Extremely easy and intuitive to use |
Easy to Locate |
PRO! Just click on the Graphics Workspace |
Object/Text Animation |
CON! Less intuitive to find but easy to use once you do. Control are also dumbed down. |
EFFECTS CONTROL PANEL PROS & CONS |
|
Ease of Use |
CON! Less Intuitive and gets confusing fast |
Easy to Locate |
PRO! Just click on the Shift+5 |
Object/Text Animation |
PRO! Extremely powerful keyframing if you are experienced. Aside from some minor flaws, this is the more professional way of animating. |
So which panel do I use to edit, modify, and animate my text? That is easy. Since I have a visual effects background and am professionally involved with programs like After Effects, I am more drawn to the Effects Control Panel. In truth, I use the Essential Graphics Panel for quick and simple formatting and then use the Effects Control Panel to get the more advanced features for animating.
WHAT ABOUT ANIMATING IN 3D?
Remember that at the time of writing this article, animating in Premiere is in 2D space only. This means that if you want to have a title animate towards the audience, you will have to use the transform property Scale. There is no 3D in Premiere without 3rd Party plugins. If you are planning to legitimately animate in 3D, my recommendation is to learn After Effects for the ultimate experience.
Thank you for reading Part 1 of this article! For more a more hands on experience and learning more about text in Premiere, check out How to Create & Edit Text in Adobe Premiere 2020 Part 2 (coming soon).
