Incorporate SmartArt
In this article, will delve a little deeper into how to incorporate SmartArt in Microsoft Excel.
For instructor-led Microsoft Excel training in Los Angeles call us on 888.815.0604..
SmartArt combines text-based information with graphics to create a more appearance-driven look. Using Excel’s tools, you will be able to create great SmartArt that can be used for a variety of different purposes. Over the course of this topic, you will learn how to insert SmartArt into your workbooks, as well as customize it after it has been inserted.
Topic Objectives
In this topic, you will learn:
- About SmartArt graphics
- About the Choose a SmartArt Graphic dialog box
- About the Text pane
About SmartArt
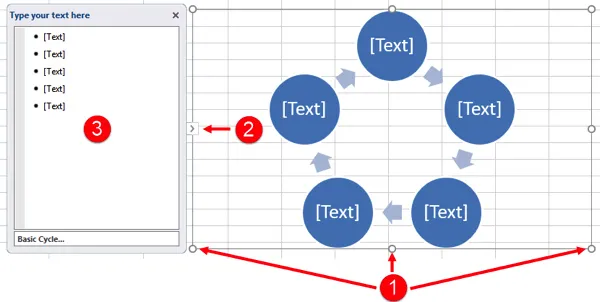
SmartArt graphics are used to visually represent text-based content. A great example of this would be a flowchart or hierarchy diagram; while you can describe these things, it is much more intuitive to the reader to see a graphic that describes and separates each step. Just like other graphical objects, SmartArt graphics are individual objects on a worksheet that can be moved and modified as group when needed. Some of these changes are made using the Sizing handles (1), while the Text Pane (3) allows you to quickly add text. This pane is toggled by clicking the arrow button (2) that appears on the left side of a SmartArt object:
The Choose a SmartArt Graphic Dialog Box
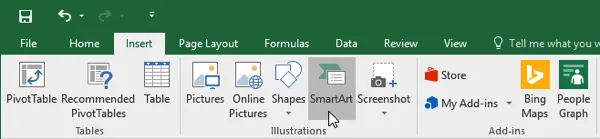
To insert SmartArt into a worksheet, click Insert → SmartArt:
This action will display the Choose a SmartArt Graphic dialog box:
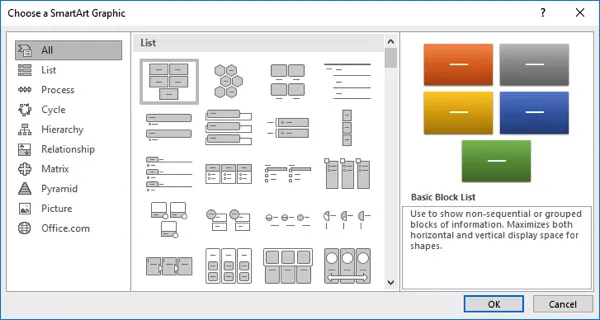
The Choose a SmartArt Graphic dialog box is divided into several categories of graphics, each of which is displayed in a panel on the left. Here is an overview of each of these categories.
- The List category is used to create bulleted lists with some visual flair
- The Process category is used to illustrate information in sequential order, such as a series of steps to complete a task
- The Cycle category is intended to illustrate continuous processes
- The Hierarchy category will display the steps in a process or the people in an organizational chart
- The Relationship category is used to show how elements can connect to each other
- The Matrix category is used to show how elements in a system relate to it.
- The Pyramid category is used to create diagrams that display how elements of varying importance, size, or power relate proportionally to each other
- Finally, the Picture category is used to create diagrams that display content using a combination of text and graphics
By clicking on these categories, you will change what type of SmartArt layouts are displayed in the middle pane. Clicking the thumbnail for a SmartArt graphic will display a preview for that graphic as well as a brief description for it. With the thumbnail still selected, click OK to insert this graphic.
About the Text Pane
When you first insert SmartArt into a worksheet, the Text pane will be displayed beside it:
(It can also be displayed or hidden by clicking SmartArt Tools – Design → Text Pane.)
Using this pane you are able to enter text into the SmartArt graphic. While you are still able to enter text directly into the graphic by clicking on the placeholder text and typing over it, the Text pane offers broader control over it.
For example, if you are working with bulleted lists, the Text pane will give you a clear indication where you are inserting text in relation to the other bullet points. Additionally, because each bullet point represents a graphic, adding new graphics is usually as simple as adding another bullet point inside the Text pane. (However, note that not all SmartArt graphics work this way. Depending upon exactly what SmartArt graphic that you are working with, adding new bullet points may just add a bullet point to the text within the shape.)
