Tracking changes in Excel
For Microsoft Excel classes based in Los Angeles call us on 888.815.0604.
In this article, we will learn how to:
- Track changes
- Review changes
Tracking Changes
When tracking is enabled, Excel will keep track of the changes that you or others who have access to your workbook have made. This includes data insertions, deletions, and more. While this feature is available in a few Microsoft Office products, Microsoft Excel is somewhat unique in that change tracking is available only in shared workbooks. While typically a shared workbook would be stored in a location where others who need to can access it, you can also track changes using a copy you only have access to.
To enable tracking on a document, click Review → Track Changes → Highlight Changes:
![]()
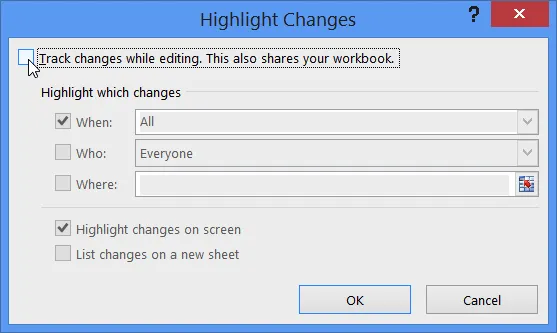
The Highlight Changes dialog will be shown. In order for you to be able to track your changes, you need to share your workbook. Click to select the “Track changes while editing…” checkbox:
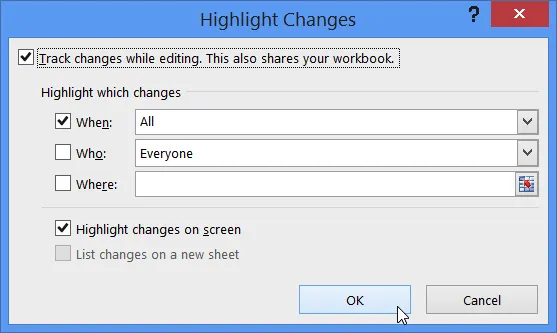
The remaining controls on this dialog will become enabled; using them you can choose exactly how changes will be tracked and highlighted. For example, you can choose to only track changes made by specific users, or even changes that have been made to a specific cell range. Leave the default settings unchanged and click OK:
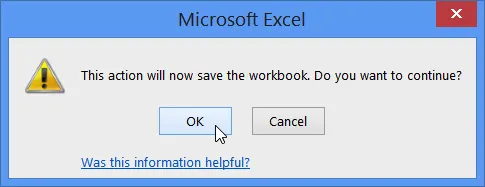
As this action is also sharing your workbook, you will be asked to resave it. Click OK:
Your workbook is now shared and tracking your changes.
Delete the contents of cell A1. This action will delete the title text that was inside of this cell. With the cell now blank, you will see that its upper left-hand corner is now shaded black:

This shading indicates that this cell has been changed since tracking changes has been enabled. Move your mouse pointer over this corner and a ScreenTip will display what user made changes to this cell, when, and what they did:
Move your cursor off of this corner and the ScreenTip will be hidden.
Reviewing Changes
After changes have been tracked on your workbook, you can then review these changes and accept or reject them as needed. To do this, first click Review → Track Changes → Accept/Reject Changes:

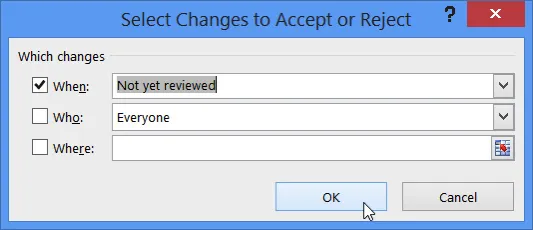
The Select Changes to Accept or Reject dialog will now be shown. This dialog includes several controls that mirror the options found in the Highlight Changes dialog. Ensure that “Not yet reviewed” is selected from the When drop-down menu and then click OK:
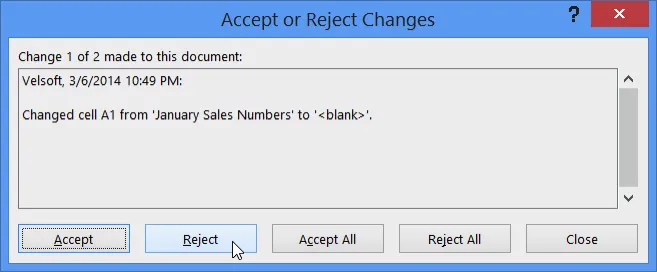
The Accept or Reject Changes dialog will now be shown. On this dialog will be displayed the details of the first change that was found on your worksheet. In this case you can see that the first change found was that A1 was changed to blank. This probably was not a good idea, so click Reject:
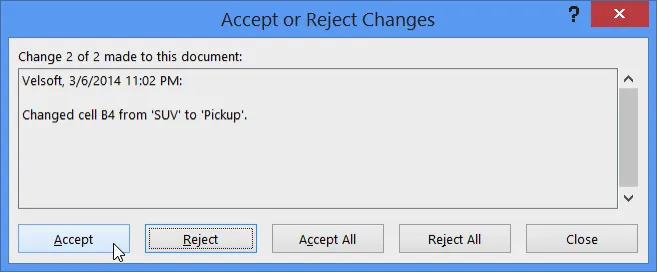
Upon clicking Reject, the aforementioned change will be reversed and the next consecutive change found in your current worksheet will be displayed. In this case you want to accept this change so click Accept:
The change that was made to the aforementioned cell will be applied to your worksheet. As you have reached the end of the changes found, the Accept or Reject Changes dialog will have closed automatically.
