Manually Archiving and Retrieving Items in Outlook
Archiving Manually
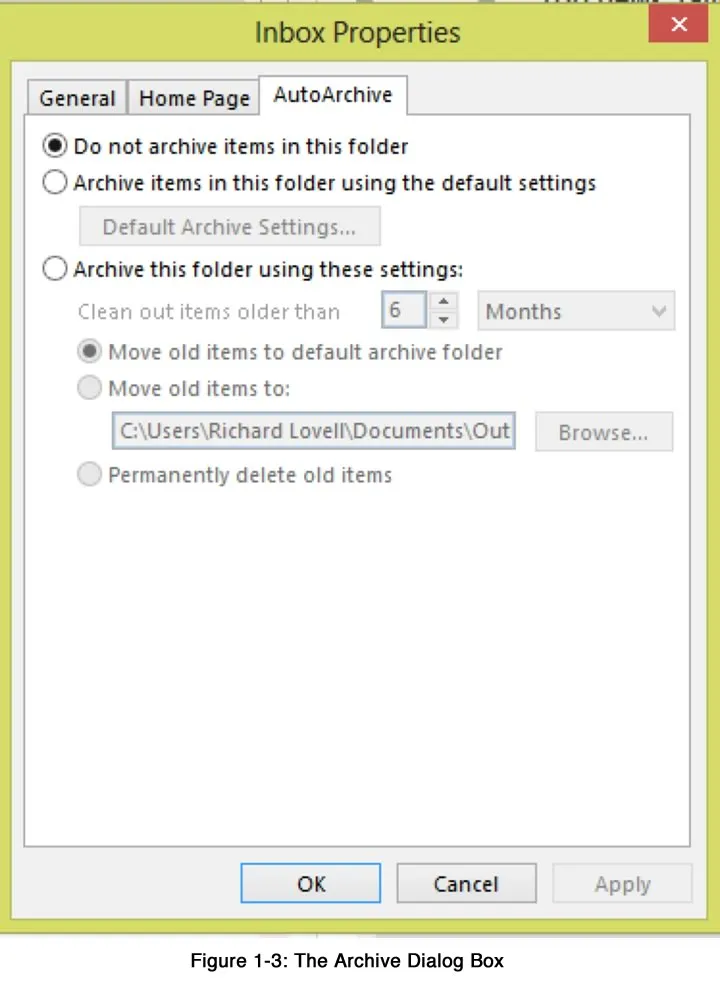
If you want to archive a folder immediately, you use the Archive dialog box, shown in Figure 1-3, which you access from the File menu. If you want to archive your Contacts folder, you can only archive it manually.
Looking for Microsoft Outlook training in Los Angeles?
Method
To archive manually:
- From the Folder tab, choose AutoArchive Settings button or Right Click on the desired folder and choose Properties. Then choose the AutoArchive tab in the Properties window.
- The Archive dialog box will appear. In the Archive dialog box, select the Archive this folder and all subfolders: option button.
- From the Archive items older than: drop-down Date Navigator, select a date.
- Choose OK.
Exercise
In the following exercise, you will archive manually.
- Right click on the Tasks folder and choose Properties, then Autoarchive. [The Archive dialog box appears.]
- Make sure the Archive this folder and all subfolders: option button is selected.
- From the Archive items older than: drop-down Date Navigator, select today’s date two months ago.
- In the Archive file text box, make sure C:\My Documents\archive.pst appears.
- Choose OK. [The items in the Tasks folder older than two months are archived.]
- If a message box appears that says, AutoArchive is ready to archive now. Do you want to have old items archived now? choose No.
Retrieving Archived Items
Once the aging period has been reached, Outlook sends you a message at startup that asks if you want it to AutoArchive your files. Your Yes response activates archiving, and Outlook stores your old files for you.
If you need an old file, you can retrieve it from the archives using the Import and Export Wizard. Outlook stores your archives in your My Documents folder as archive.pst. As with other Microsoft wizards, this wizard walks you step-by-step through the importing process.
Before you complete the final step in the Import and Export Wizard, Outlook lets you select whether to replace duplicates with imported files, to allow duplicates to be created, or not to import duplicates. You make your selection with the option buttons shown in Figure 1-4. If you indeed have duplicates, you might find it helpful to allow duplicates to be created so that you can examine both items to decide which one you want to keep. Then you can delete the unwanted item. You might also decide that any duplicate in your active file is more current than what you have stored in your archives, in which case you would not want to import duplicates at all. If you are indeed searching for an older version of an active item, then you might prefer to replace duplicates with imported files.

Method
In the following exercise, you will retrieve archived items.
- From the file menu, choose Open and Export, choose Import/Export.
- In the first screen of the Import and Export Wizard, choose Import from another program or file:
- Choose Next.
- Then choose from Select file type to Import from: Outlook Data File (.pst).
- Choose Next.
- In the File to import area, select the correct path and folder by pressing Browse and navigating to the Outlook data file.
- In the Options area, select a duplicate import option depending on user preference.
- Choose Next.
- In the next Import Personal Folders screen, accept the selections, and then choose Finish.
Exercise
In the following exercise, you will archive manually.
- Make sure the Tasks folder is open and sorted by due date.
- From the File menu, Open & Export, choose Import. [The Import and Export Wizard appears.]
- In the Choose an action to perform: area, select Import from another program or file (each of these areas give a Description at the bottom of wizard dialogue box as to what this action will do and in this case this action also includes the import of Outlook Data Files (.PST))
- Choose Next. [The first Import a File screen of the Import and Export Wizard appears].
- From the file type to import from: Select Outlook Data File (.pst)
- Choose Next.
- The Import Personal Folders screen will appear.
- In the File to import area, make sure C:\My Documents\archive.pst is selected.
- In the Options area, select the Allow duplicates to be created option button.
- Choose Next. [The second Import Personal Folders screen appears].
- Accept the selections, and then choose Finish. [The archives are retrieved and reappear in your task list.]
