Auto Archiving in Outlook
Managing Items
When your Outlook items become out of date, you can store them or delete them. You can archive them automatically after a specified time interval or archive them manually. When you archive your items, you store them in your My Documents folder on your hard drive. You can retrieve archived items at any time.
Another way to make item management easier for yourself is to specify categories for your items. A category is a keyword or a phrase you add to an item to help identify it. Designating categories helps you find and group your items. In addition, by creating your own filters, you can show and hide items according to your own criteria.
Looking for Outlook training in Los Angeles?
Setting Up AutoArchiving
In no time, you can collect a tremendous amount of Outlook data, especially e-mail messages that can crowd your folders and make it difficult to find wanted items. You can manually transfer individual files to a storage area, but it is more efficient to let Outlook archiveolder data on a regular basis and store the data for you in your My Documents folder.
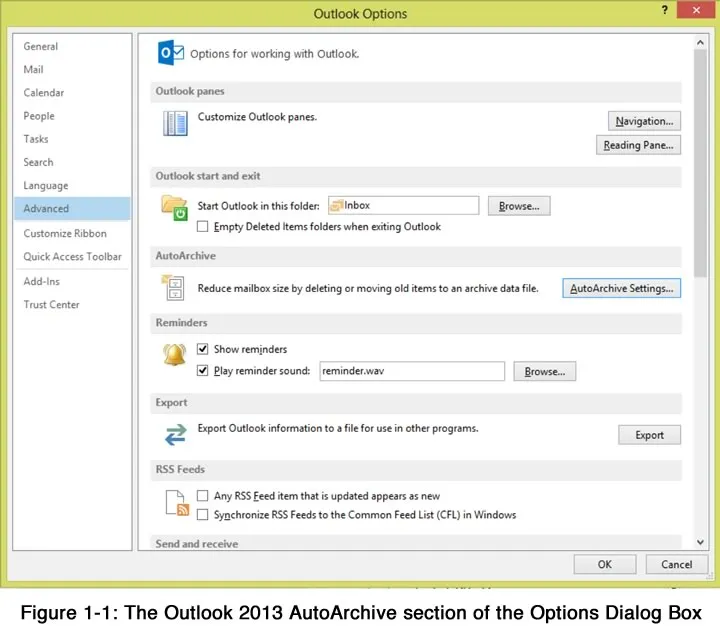
Setting up AutoArchiving is a two-step process: First you set the intervals in the Options dialog box, shown in Figure 1-1. Then you set the options in the Properties dialog box for each folder. You set the options in each folder's Properties dialog box except for the Contacts folder, which cannot be AutoArchived.
The default aging period for Calendar, Tasks, and Journal is six months; for Sent Items and Deleted Items, it is two months. By default, Outlook archives your data every two weeks. This means that every two weeks Outlook checks your data files to see if any are older than their aging period. When Outlook finds files that fit this profile, it asks you at start up whether to archive them. You can change the aging period for each folder on the AutoArchive page of a folder’s Properties dialog box.
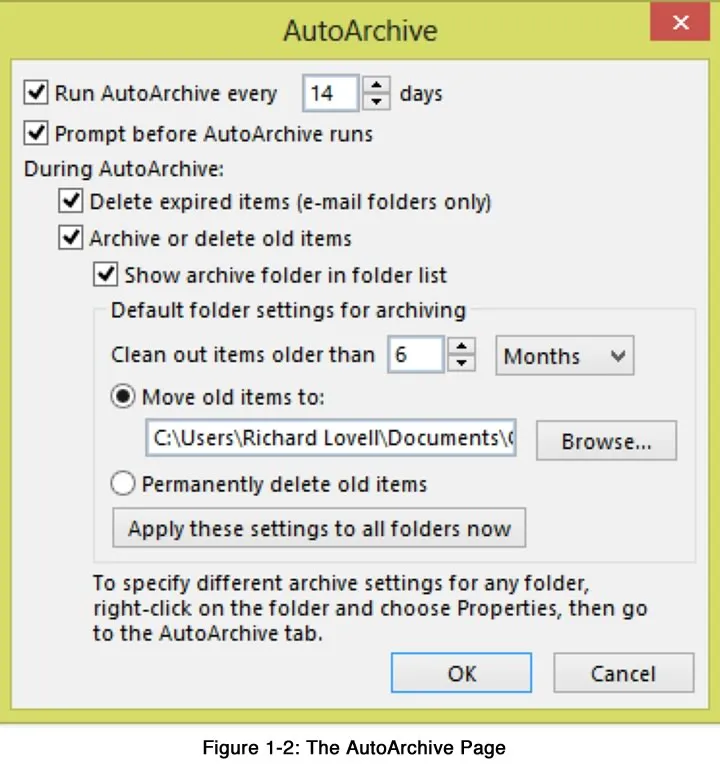
If you want to AutoArchive the data in your Inbox and Notes folders, you must turn on the AutoArchive feature for these folders yourself. You turn on the AutoArchive feature for these folders using the AutoArchive page of the Properties dialog box for the folder you want to archive. Figure 1-2 shows the AutoArchive page of the dialog box.
After you set up AutoArchiving, the feature automatically activates whenever you start Outlook. If the aging period for a folder has expired, Outlook displays a message box at startup that asks, Do you want to AutoArchive now? You then choose whether to complete the archiving process. If you do not choose to archive at the time of the notice, Outlook does not notify you about archiving again until the AutoArchive period for the next folder has expired.
Method
- From the File menu, choose Options.
- In the Options dialog box, select the Advanced button.
- On the AutoArchive section, select the AutoArchive Settings button.
- The AutoArchive dialog box will appear.
- Place a tick in the Run AutoArchive every check box.
- In the AutoArchive every ... day(s) at startup spin box, enter the number of days.
- Choose OK. And OK again.
- On the Navigation Bar, right-click an Outlook folder in Mail and select Properties The Properties dialog box for that folder will appear.
- In the Properties dialog box, select the AutoArchive tab.
- On the AutoArchive page, if necessary, select the Archive this folder using these settings.
- In the Clean out items older than spin box, enter the number of units, and from the drop-down list, select the calendar period.
- If necessary, select Move old items to: choose Browse, and in the Find Personal Folders dialog box, select the drive and path for the archive file. Choose OK
Exercise
In the following exercise, you will set up AutoArchiving.
- Start Outlook and log on. [Reminders might appear.]
- If necessary, dismiss all reminders.
- Open the Tasks folder. [The task list appears in the Task Navigation Pane on the left hand side of your screen.]
- Make sure the Current View is Simple List.
- Sort the list by Due Date, displaying the oldest task first.
- From the File menu, choose Options. [The Options dialog box appears.]
- Select the Advanced button. [The AutoArchive option appears here.]
- Make sure in the AutoArchive every check box is selected.
- In the AutoArchive every ... day(s) at startup spin box, enter 7
- Make sure the Default archive file: area displays the file path C:\My Documents\archive.pst
- Choose OK and OK again.
- On the Outlook Bar, right-click the Journal shortcut. [The shortcut menu appears.]
- Choose Properties. [The Journal Properties dialog box appears.]
- Select the AutoArchive tab. [The AutoArchive page appears.]
- In the Clean out items older than spin box, enter 2, and in the drop-down list box, make sure Months is selected.
- Select Move old items to: option and Choose Browse.
- In the Find Personal Folders dialog box, select C:\My Documents\archive.pst
- Choose OK. [The data in the Journal older than two months is set to be archived the next time you open Outlook].
