Creating Excel Workspaces
Creating and Opening a Workspace
You use a workspace when you need to save a configuration of open workbooks on your system. In other words, let's say you've opened two or three workbooks, have arranged them satisfactorily, and then discover that you're out of time. Instead of repeating all the arranging the next time you start Excel, you simply save the arrangement as a workspace.
The workspace file you create provides instructions to Excel about arranging and opening workbooks; however, it does not contain the workbooks themselves. When you open the workspace file, the actual workbooks appear. Because the workspace file contains pointers to the workbook locations, it’s important not to move the workbooks that are part of the workspace into new folders, unless you move them from within the workspace itself (i.e., by using the Save As command).
To register for an Excel class in Los Angeles call 888.815.0604.
Method
To create a workspace:
- Arrange all open workbooks as desired.
- From the View tab, choose Save Workspace.
- In the Save Workspace dialog box, from the Save in drop-down list, select a folder in which to store the workspace.
- In the File name drop-down combo box, type a name for the workspace.
- Choose Save.
To open a workspace:
- On the File Button, click the Open button.
- In the Open dialog box, select the file name of the workspace.
- Choose Open.
Exercise
In the following exercise, you will create and open a workspace.
- Make sure the Latham College and Advertising workbooks are both open and tiled side by side.
- From the View tab, in the Window group, choose Save Workspace. [The Save Workspace dialog box appears].
- In the Save in drop-down list box, make sure the Data folder is selected.
- In the File name drop-down combo box, type Latham.
- Choose Save. [The Latham workspace is created. A message box appears asking you if you want to save the Latham College workbook].
- Choose OK.
- Select the Advertising workbook window.
- Maximize and then close the Advertising workbook window. [The Latham College workbook is active].
- Close the Latham College workbook. [There are no open workbooks].
- On the File Button menu, click the Open button. [The Open dialog box appears].
- In the file list box, select Latham.
- Choose Open. [The workspace opens, with the Latham College and Advertising workbooks tiled side by side].
Managing Multiple Worksheets and Workbooks
As you develop your workbooks, you may find that one worksheet isn't sufficient for the complexities of your data. In fact, it will probably prove necessary at times to move and copy entire worksheets, and then pasting them into multiple workbooks. Similarly, moving and copying data between worksheets and workbooks is equally valuable in creating and maintaining your workbooks.
Moving and Copying Worksheets
Sometimes, you'll want to change the order of the worksheets in a workbook. For instance, assume you created a sequence of worksheets named 1993, 1992, 2000, 2001, and 1999. At the time, it might have been convenient, but now it doesn’t make much sense. Luckily, Excel provides tools to make reorganizing the workbook easy. You can reorder worksheets by moving them. Making copies of worksheets is also useful for a number of reasons. For example, you might want to experiment with a table without affecting the original data. Using a duplicate worksheet makes this easy and safe. At another time, you might need to use the copy for creating multiple worksheets of similar structure. One way to move or copy worksheets is by dragging. When you drag the sheet tab, the mouse pointer with a small sheet of paper and a small, black triangle marks the location of the dragged worksheet. As an alternate method, you can use the Move or Copy dialog box, shown in Figure 1-6.
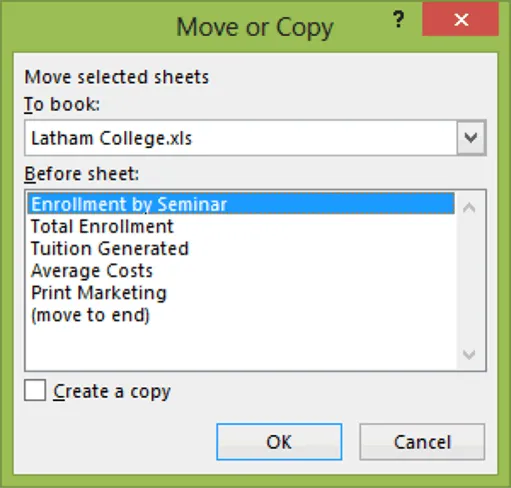
Figure 1-6: The Move or Copy Dialog Box
Method
To move a worksheet:
Mouse method
- Drag the sheet tab of the worksheet to its new location, releasing the mouse button when the black triangle is in the desired location.
Shortcut menu method
- Right-click the tab of the worksheet you want to move.
- From the sheet tab shortcut menu, choose Move or Copy.
- In the Move or Copy dialog box, from the To book drop-down list, select the desired workbook.
- In the Before sheet list box, select the worksheet before which the moved sheet will appear.
- Choose OK.
To copy a worksheet:
Mouse method
- Press and hold Ctrl.
- Drag the sheet tab of the worksheet to its new location, releasing the mouse button when the black triangle is in the desired location.
- Release Ctrl.
Shortcut menu method
- Right-click the tab of the worksheet you want to copy.
- From the sheet tab shortcut menu, choose Move or Copy.
- In the Move or Copy dialog box, from the To book drop-down list, select the desired workbook.
- In the Before sheet list box, select the worksheet before which the copied sheet will appear.
- Select the Create a copy check box.
- Choose OK.
Exercise
In the following exercise, you will move and copy worksheets.
- Make sure the Latham workspace is open.
- In the Advertising workbook window, select the Computers worksheet.
- Drag the Computers sheet tab to the Latham College workbook window, releasing the mouse button when the small, black triangle is located after the Total Enrollment sheet tab. [As soon as you click the mouse, the mouse pointer changes to a mouse pointer with a small sheet of paper, and the small, black triangle appears. The Computers worksheet is moved from the Advertising workbook to the Latham College workbook].
- Maximize the Advertising workbook window.
- Right-click the Mass Mailing 2001 sheet tab. [The sheet tab shortcut menu appears].
- Choose Move or Copy. [The Move or Copy dialog box appears].
- From the To book drop-down list, select Latham College. [The Before sheet list box displays the worksheets in the Latham College workbook].
- In the Before sheet list box, select Computers.
- Choose OK. [The worksheet is moved. The Latham College workbook fills the screen].
- Click the Restore button in the Latham College workbook. [The workbooks are tiled, and the Mass Mailing 2001 worksheet is visible in the Latham College workbook window].
- In the Latham College workbook window, right-click the Mass Mailing 2001 sheet tab. [The sheet tab shortcut menu appears].
- Choose Move or Copy. [The Move or Copy dialog box appears].
- From the To book drop-down list, select Advertising. [The Before sheet list box displays the worksheets in the Advertising workbook].
- In the Before sheet list box, select Mass Mailing 2002.
- Select the Create a copy check box.
- Choose OK. [A copy of the Mass Mailing 2001 worksheet appears in the Advertising workbook window].
- In the Latham College workbook window, select the Average Costs worksheet.
- Press and hold Ctrl.
- Drag the Average Costs worksheet to the Advertising workbook window releasing the mouse button when the small, black triangle is located after the Summary worksheet. [As soon as you click the mouse, the mouse pointer changes to a mouse pointer with a sheet of paper and a plus sign, and the small, black triangle appears. The copy of the Average Costs worksheet appears in the Advertising workbook window].
- Release Ctrl.
Selecting Multiple Worksheets
So far, you've selected only one worksheet at a time. This forces you to perform tasks such as inserting and deleting worksheets over and over. It's often faster to insert or delete several worksheets at one time. The same applies to moving and copying worksheets. That's why knowing how to select multiple worksheets is so important.
Method
To select multiple worksheets:
- Select the first worksheet.
- Press and hold Ctrl.
- Select additional worksheets as desired.
To select all worksheets:
-
Right-click any sheet tab in the workbook.
From the sheet tab shortcut menu, choose Select All Sheets.
To deselect all worksheets:
-
Right-click any sheet tab in the workbook.
From the sheet tab shortcut menu, choose Ungroup Sheets.
Exercise
In the following exercise, you will select and deselect multiple worksheets.
- Maximize the Latham College workbook window.
- Make sure the Average Costs worksheet is selected.
- Press and hold Ctrl.
- Select the Print Marketing worksheet. [Two worksheets are selected].
- Select the Tuition Generated worksheet. [Three worksheets are selected].
- Release Ctrl.
- Select the Total Enrollment worksheet, and then scroll to view the previously selected worksheets. [Only the Total Enrollment worksheet is selected].
- Click the 4th tab scrolling button. [The three previously selected worksheets are no longer selected].
- Right-click the Total Enrollment sheet tab. [The sheet tab shortcut menu appears].
- Choose Select All Sheets. [All sheets are selected].
- Right-click the Total Enrollment sheet tab. [The sheet tab shortcut menu appears].
- Choose Ungroup Sheets. [Only the Total Enrollment worksheet is selected].
- Save and close the Latham College workbook. [The Advertising workbook is active].
