Excel Essentials - Printing and Exiting
Learning to Print Excel worksheets and exiting from Excel is covered in our beginner Excel spreadsheeting course.
Printing a Worksheet
You may want to print your worksheet when you’ve finished working with it. This will give you a hard copy of your data to look over and to share with others. Best of all, you can get a quick printout of the active worksheet very easily.
Method
To print a worksheet:
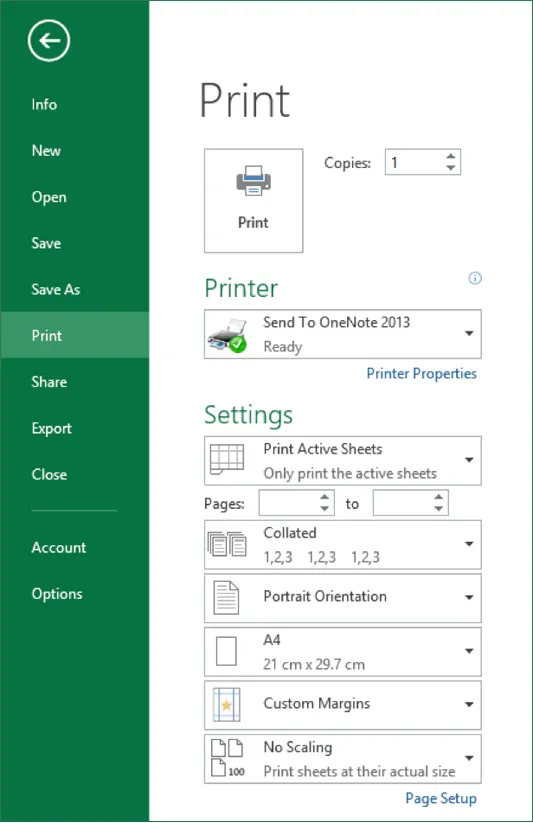
- Click the FILE button and choose the Print button.
Exercise
In the following exercise, you will print a worksheet.
- Click the FILE button and choose the Print button. [The PRINT dialog box appears].
- Select the printing options you require. [Click the PRINT button. The worksheet is printed.]
Closing a Workbook and Exiting from Excel
Closing a workbook removes it from your screen but leaves you in Excel so that you can keep working. Before you close a workbook, you should make sure that you’ve saved your work. If you’ve forgotten, however, Excel reminds you that you need to save the document and gives you a chance to do so. You can exit from Excel after you have saved and closed any open workbooks.
Method
To close a workbook:
- Click the workbook Window Close button.
or - Click the FILE button and choose Close.
- Save the file if prompted.
To exit from Excel:
- Click the application Close button.
or - Click the FILE button and click the Exit Excel button (bottom right).
- Save the file if prompted.
Exercise
In the following exercise, you will close the Orchard Report Draft workbook and exit Excel.
- Click the workbook Window Close button. [Save As appears].
- If a message appears asking you if you would like to save the changes to the workbook file, choose Yes. [The workbook closes].
- Click the application Close button. [Excel closes].
Assignment
- Load Excel.
- Select cell C3 with the keyboard.
- In cell C3, enter Cathy’s Computers.
- In cell C4, enter Sales Report.
- Using the keyboard, select the range B6:E6.
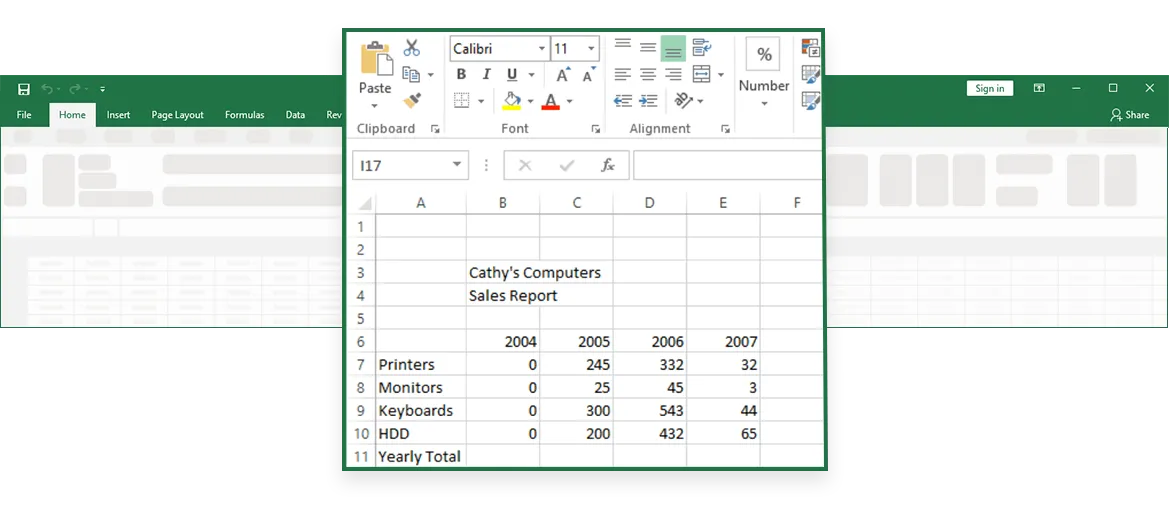
- Using Figure 1-11 as a guide, enter the years in the range B6:E6.
- Select the entire worksheet.
- Use the mouse to select the range A7:A10.
- Using Figure 1-11 as a guide, enter the product names into the range A7:A10.
- Enter zeros in the range B7 through B10.
- Using a range, enter the data for 2007, 2008, 2009 and 2013.
- Adjust the width of column A so you can read the text clearly.
- Select the nonadjacent cell ranges B6:E6 and A7:A10.
- Save the worksheet in the Data folder on the C: drive as Cathy’s Computers.
- Save cells A1:E10 in the Data folder as an HTML document (with no title or header) with the name Cathy.htm.
- In cell A11, enter Yearly Total.
- Use Save As to save the workbook again. Use the file name Cathy’s Computers Draft.
- Print the worksheet.
- Close the workbook, and then exit Excel.