Superhero Motion Effects In Adobe After Effects
By Kristian Gabriel, Adobe Expert/ACI
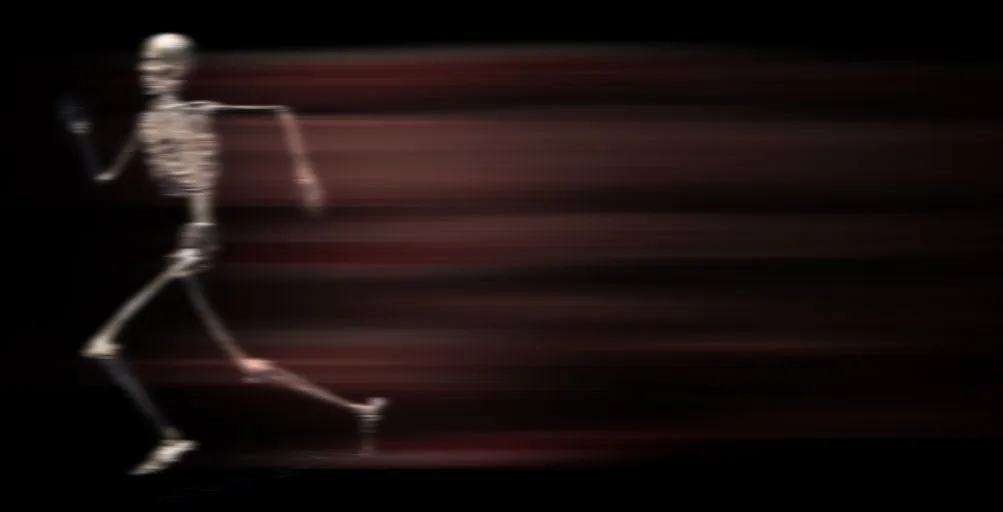
The other day I was watching the series The Flash on Netflix and remembered how, when I was younger, I wanted to run "superhero" fast! Who wouldn't want to do that? For a short while, my 7-year-old self was a believer that this was actually possible. Unfortunately, the inevitable reality set in. Combine this with my body type and the fact that I hated physical education. I think you get the idea! Anyway, motion blur and motion trail effects have been a staple of the superhero and fantasy film genres for a very long time. The idea that someone can run faster than a speeding bullet still captures imaginations today. The digital effects of motion blurring and motion trailing go way beyond human speed though. They can add a sense of organic movement to animated titles and logos and even give basic shapes and particles like like behaviors. In this article, I am going to give you a simple pathway to achieving a superhero-like motion effect that you can modify or reverse engineer into creating all kinds of motion effects.
Need to learn Adobe After Effects? We run the best After Effects workshops in Los Angeles, and our trainers can deliver onsite training right across the country. Obtain a quote for onsite Adobe training.
Breaking Down The FX
Fundamentally, motion blur effects for fast-moving objects can be broken down in two categories: High Speed without Definition and High Speed with Definition. High Speed without definition allows you to see an object moving very, very quickly - but you see very little detail as to what or who is moving that fast. This type of motion effect can be seen on titles and other types of graphics that animate in very quickly and then slow down or stop to reveal what the object or words are. Within the motion effect itself - it's not always necessary to see detail or even know what is moving that fast if the end result is going to be sitting right in front of your eyes. High Speed with Definition allows you to see an object moving very, very quickly and you can also visibly tell what or who the fast-moving object or person is.
Once you've determined which style of motion effect you are going for - you can begin to pull your assets together in After Effects. Whether you have chosen High Speed with or without Definition - the process of motion blurring your object will work much better if you have isolated your object on its own layer. For example, if you wanted to shoot yourself running fast it would be best to shoot yourself against a green screen and then shoot your background separate so you can put the two together later and have control over each separately. In the following exercise, I will be using simple free footage from YouTube. If you would like to follow along, you can download the YouTube file here: https://youtu.be/9rH0GM3FzTA
Setting Up The File
To continue working on this file - you will need to do the following:
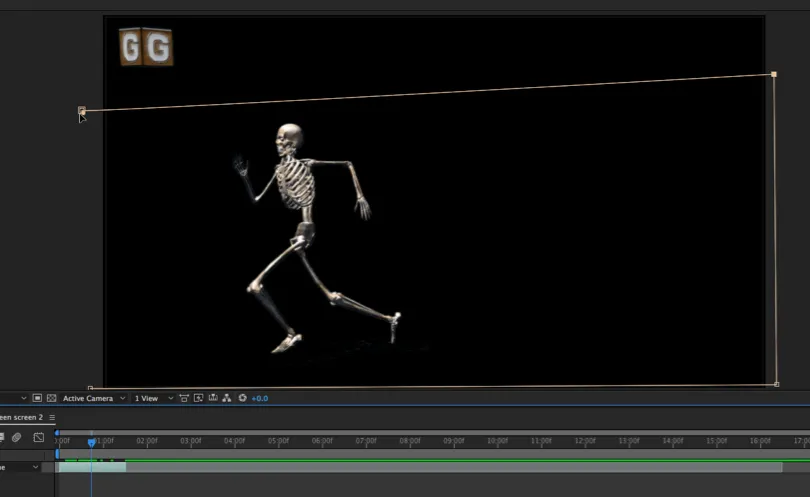
- Import the Running Skeleton Green Screen footage or whatever footage you have into After Effects (File > Import > File)
- Drag your footage from your Project panel to the New Composition button at the bottom of the panel (this will create a brand-new Composition with your footage in it)
- Use Option+[ and Option+] to trim your footage down (playhead editing). If you are using the same file I am, there is an opening title as well as several versions of the skeleton running we don't want to use. I'm using the first run of the skeleton and have cut the footage down to just this piece (it’s roughly about 1 second and 14 frames). Note: You can cut your footage down any way you wish.
- Make sure your footage begins at the beginning of your composition (if it's not, select your layer, hit the Home Key on your keyboard and then Left Bracket '['. This will slide and snap the head of your footage to the playhead.
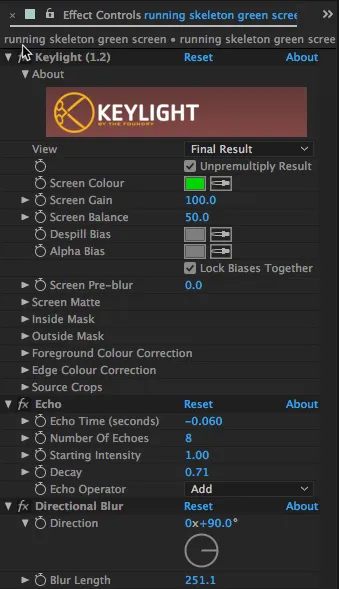
- Key out the green screen. To keep things simple, select your layer and then go to EFFECT > KEYING > KEYLIGHT. Under Keylight's Effects Controls go to the property Screen Colour and select the sample tool. Now click any of the green in your Composition window to isolate your object. Note: If you are using your own images, you may have additional clean-up to do. Every image and video is different!
- The final thing before we begin is to get rid of the watermark logo in the upper right of the footage (if you are using your own footage - ignore this). To do this, use the Pen Tool to select only the portion of the running skeleton as illustrated above. Make sure to close the path and the logo will disappear.
Adding Your Superhero-like Motion Effect
Now that we have a video to play with, move your playhead until you can see your skeleton clearly and let's start to build out our effects. At this point, it's time to go over what we are about to do. We are going to create a High Speed motion effect with Definition. To do that, we need to create a duplicate our skeleton layer. Why? One layer will be used for the speed effects and the other layer will be used to control how much definition we want within our motion effect. Do the following:
- Select your layer and use Cmd+D (MAC) or Cntl+D (WIN) to Duplicate your layer
- Name your layers: Detail Control (bottom), Motion Effect (top)
- Your Motion Effect layer (top layer) will be the one that will actually create your trail. Select your Motion Effect layer and go to EFFECT > TIME > ECHO. The Echo effect is a popular After Effects effect that can create simple echoes and amazing streaming effects.
- Now use these values to dial in your Echo in your Effect Controls: Echo Time = -0.060 (controls the amount of time between echoes), Number Echoes = 8, Starting Intensity = 1.00 (the opacity of the first image in the echo sequence), Decay = .71 (the echo trailing opacity) Note: Leave everything else at default values.
- The Echo effect is amazing - but we need to boost the motion blurring. Go to EFFECT > BLUR & SHARPEN > DIRECTIONAL BLUR and in your Control Panel - make the Direction = 90° (this should make your motion blur whatever direction your object is moving in) and make Blur Length = 251.1
- You should have a pretty cool looking blur by now - and if you are using the video I am using - there is not much color in the blur. If you want to modify the color or add color - go to EFFECT>COLOR CORRECTION > COLOR BALANCE. Using Color Balance, we can alter and add color in the highlights, midtones or shadows. Here are the settings I have used: Shadow Red Balance = 82.0, Midtone Red Balance = 100.0, Highlight Red Balance = 81.0