Creative Pathways in Photoshop
By Kristian Gabriel, Adobe Expert/ACI
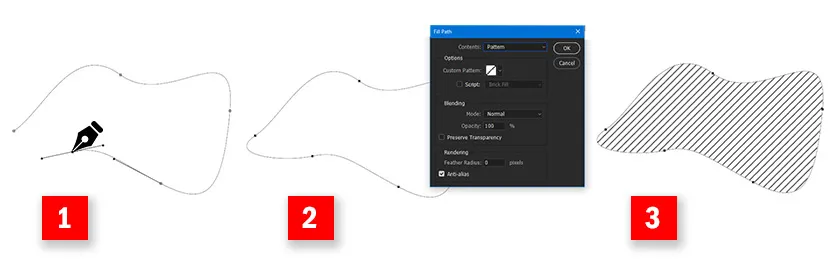
Two extremely fun and useful features that many Photoshop users tend to overlook are Fill and Stroke Path. Hidden in the depths of the Path Panel menu or accessing the functions through the hollow and solid circle shaped buttons at the bottom of the panel, Fill and Stroke Path offers users both real utility and creative benefits.
To join an accredited Photoshop class in Los Angeles call us on 888.815.0604

Fill Path allows users to fill a path with any pattern, color, gradient, history state or even Content-Aware, making this feature a serious healing utility or a creative frame to shape content. Stroke Path gives users the power to stroke dozens of useful toolsets across a vector path including healing tools like the Spot Healing Brush, Healing Brush, Clone Stamp, Smudge, Blur, Dodge, Burn and so many other artistic and reparative tools and functions. Let’s look at where each of these features are located and how to use them.
Fill Path
Before you can fill a path, you need to create one. A closed or open path will both work keeping in mind that an open path will only insert fill in its Bezier curves or path angles. Drawing freehand with the Pen Tool is probably the most popular option for the Fill Path feature, however any tool or function that creates a path will work. Using tools such as the Rectangle Tool, Rounded Rectangle Tool, Ellipse Tool, Polygon Tool and the Custom Shape Tool all produce closed paths and are perfect for filling, but you may find that the Fill Path and Stoke functions are grayed out. There is an easy fix for this. After you create paths using the closed paths tools, you will need to go to the top of the Path Panel Menu and Save Path to unlock Fill and Stroke Path.
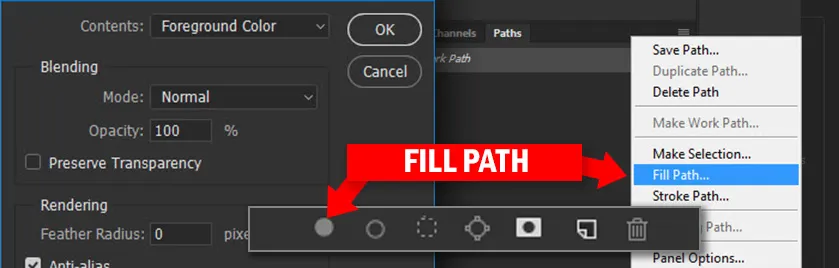
Once your path is finished you can activate Fill Path by going to Path Panel Menu > Fill Path or by going to the bottom of the Path Panel and Alt-Clicking (Windows) or Opt-Clicking (Mac) on the filled circular button. Once the Fill Path dialogue window opens, you will be able to choose what you would like to fill your path with and even add Blending Modes and feathered edges.
*Note: Clicking on the filled circular button at the bottom of the Path Panel without holding down Alt or Opt will fill path with the default foreground color or will fill based on your previous settings.
Stroke Path
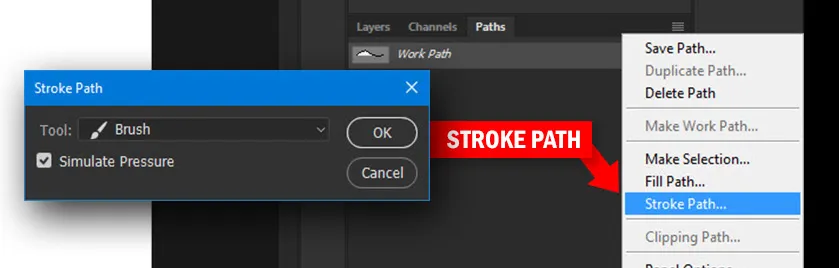
Like Fill Path, Fill Stroke begins with you creating an open or closed path. Once you have finished drawing that path, you can access Stroke Path in the same location as Fill Path. Go to Path Menu > Stroke Path. You can also Alt-Click (Windows) or Opt-Click (Mac) the open circle button at the bottom of the Path Panel.
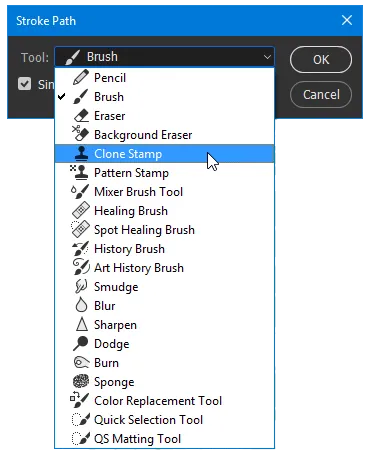
Once you open the Stroke Path dialogue window, under Tool, you will have a large amount of choices (20 as of Adobe Photoshop CC 2017) to apply across your path. VIP: To set the properties of the Healing Brush, Burn, Color Replacement or any tool on this list, you need to go to that tool before going to Stroke Path and set the radius, opacity or any other property that requires modification.

Now that you’ve learned how to access Fill Path and Fill Stroke let me give you some ideas for their use. Since vector paths tend to be used primarily for precision-based artwork or selections, you can use Fill Stroke to color sketches and line-based art. Many graphic artists will also trace elements from photographs and convert them to clip art or other types of graphic art. Fill Stroke could be used to add shading and textures to add depth and bring them to life. Want to remove something from a photograph or piece of art? Try creating a closed path around it and choose Content-Aware in the Fill Path dialogue window.

And what about Stroke Path? One might argue there are even more uses for this amazing feature. Imagine cloning across a path to re-create a fence or add a line of missing bricks from the side of a building. Or perhaps you wish to remove a row of bricks. Try using the Eraser Tool on a path to eliminate pixel art with surgical precision. Interested in creating a new logo? Draw a path in any shape or form and use an infinite amount of creative organic and technical brushes to draw across every angle or Bezier curve. Click on the Simulate Pressure toggle in the Stroke Fill dialogue window to taper the beginning and end of your stroke. Create decorative frames for certificates, birthday cards and flyers by creating a rectangular path around the border and using Stroke Fill to add art or even organic elements like wood or metal.
The uses for Fill and Stroke Path are endless in Adobe Photoshop. Hopefully you will find these features as indispensable in your workflows as I have. Give them a try and see where your pathways take you.
Fill Path & Stroke Path: https://adobe.ly/2kyBrKe
-
Address
915 Wilshire Blvd,
Suite 1800.
Los Angeles CA 90017 - Phone (888) 815-0604
- Email Show Email
In person v online training
In line with state protocals we have now fully resumed in person or classroom training.
Trainees still have the option of joining any of our classes remotely via Zoom webinar.
To attend any clasess remotely first add any class to your
cart and then click the small check box below the class. See screenshot below.

You will receive webinar login details for your training 2-3 working days before your class is due to commence.