10 Typically Ignored But Useful Features In Photoshop
By Kristian Gabriel, Adobe Expert/ACI
Many of us working with Adobe applications tend to focus on the features and functionalities that we need for our occupation or personal projects. Unfortunately, there are so many great features that get overlooked or just simply ignored. The following is a list of useful features that so many Photoshop users typically ignore. Let us begin!
To join one of our Adobe Certified Photoshop classes in Los Angeles call us on 888.815.0604
Ignored Feature #01 Duplicating Smart Objects
Duplicating Smart Objects seems so easy and straight-forward. Hit the classic shortcut, Command or Control + J to duplicate any layer and you’re done. The problem with this method is that the original files inside the Smart Object are now shared among the duplicate layers. This means that if you step into your Smart Object to change anything, it changes it for ALL duplicated layers. To truly duplicate a Smart Object and create an independent layer not linked to its origin, Right-Click any Smart Object Layer and choose New Smart Object via Copy.
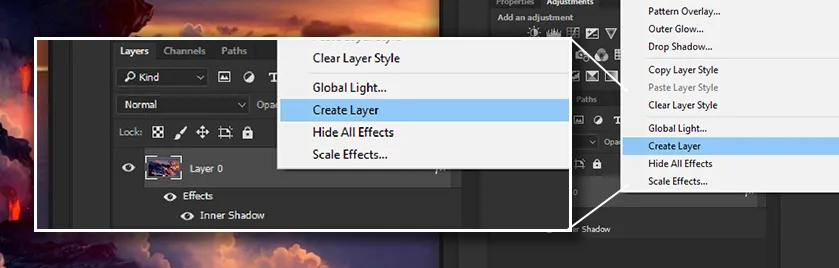
Ignored Feature #02 Create Layers (Layer Styles to Pixels)
If you have ever used Layer Styles in Photoshop you know that they can add non-destructive effects like Drop Shadows, Bevels, Glows and a lot more to any of your layers. The bad news is that editing these effects are extremely limited in their non-destructive form. One way of making these effects more editable is to rasterize the effects on their own layers so they can be manipulated with tools like the Eraser Tool or Layer Masks, which allow variable control over layer visibility. To perform this, you need to Right-Click on the FX symbol on any layer (or go to Layer > Layer Styles) and select Create Layers. Create Layers will “break” your Layer Styles up into their own rasterized layers, separating top effects like Bevels and Inner Glows to layers above your origin layer while separating bottom effects Drop Shadows to layers below your origin layer.
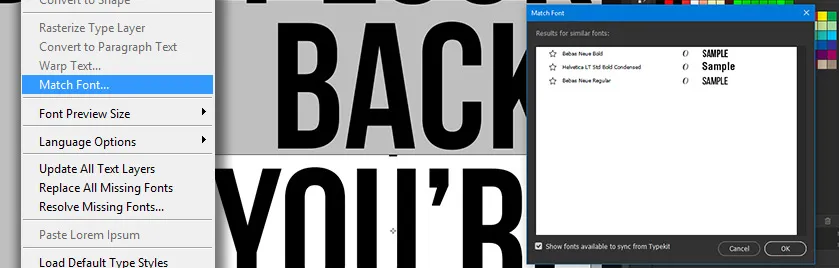
Ignored Feature #03 Match Font
Match Font was released in Photoshop version 2015.5 and was created to aid users in identifying fonts from layers. When using this feature, Photoshop will scan a JPEG or other file and then search across Type Kit and other sources to identify your font. If the font is in Type Kit, it will allow you to install and sync those fonts for immediate use. To use Match Font, select any layer and then go to TYPE > MATCH FONT. Then adjust the “crop” handles to define the area you want Photoshop to focus on.
Ignored Feature #04 Find & Replace Text
Have you ever wanted to replace a word with another word? Find & Replace Text in Photoshop will allow you to do just that. If you go to Edit > Find and Replace Text you will simply be able to search and replace text at the same time.
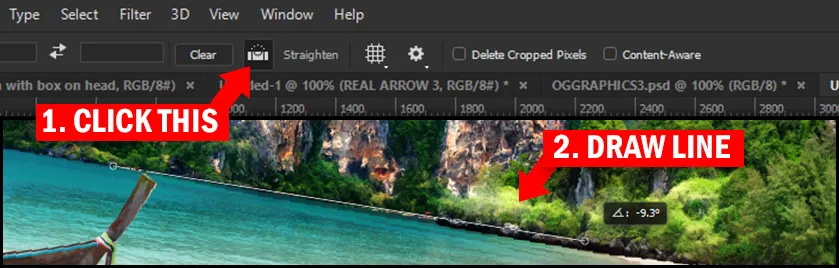
Ignored Feature #05 Straightening Documents
If you are unlucky enough to have a photograph or graphic that is crooked, you should know that the manual way to fix this is to use Command or Control + T to activate Free Transform and then hover outside of any of the transform points to get the rotate symbol. Then you Left-Click and drag to rotate your image into place. Another way to straighten your document is to click on your Crop Tool and make sure your Straighten By Drawing Line button in the Options Panel is on. Then, draw a line across your document to tell Photoshop the angle that needs to be straightened. Voila! You’re done. An alternate to this is to draw any line with the Ruler Tool to tell Photoshop the angle that needs to be straightened and then go to Image > Image Rotation > Arbitrary. The number in the input box is the number Photoshop has determined will correct your crooked document. Just hit the OK button and you are home free!
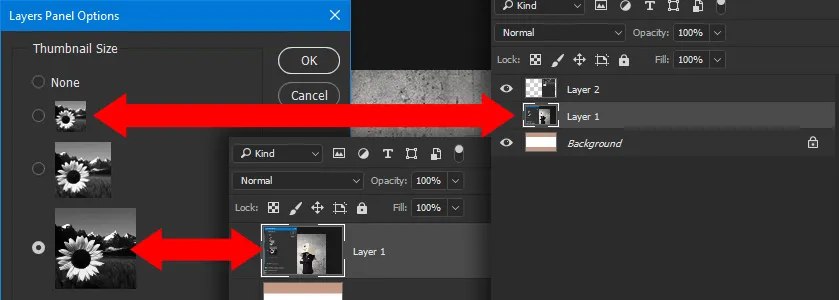
Ignored Feature #06 Layers Panel Options
A lot of overlooked, useful functionality exists in the panel menus throughout Photoshop. The Panel Options in the Layers panel, for example, allow you to change the size of your layer thumbnails, adjust the way your layers fit around your layer thumbnails and even allows you to adjust specific naming functions for copied layers. FYI, you can also right click on any layer’s thumbnail to choose the thumbnail size.
Ignored Feature #07 Isolate Layers
If you have ever worked on a Photoshop document with a lot of layers, you know that it can be really challenging scrolling up and down continuously to find the specific layers you want. In comes Isolate Layers. Isolate Layers allows you to select any number of layers and isolate them by hiding all the non-selected layers. If you understand the concept of “soloing” a layer in music, its works the exact same way.
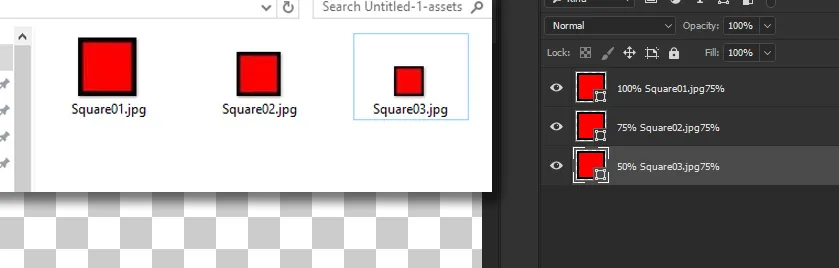
Ignored Feature #08 Generate Image Assets
Generate Image Assets is one of those features in Photoshop that most curious users will experiment with to find out that it does “nothing.” The truth is that it does a lot - but it requires you to do a little prep beforehand. Generate Image Assets primary task is to output your layers as individual image formats like JPEG,.webp or GIF. What makes this method unique is that you need to label your layers in a specific way so that Photoshop knows what format, size and or quality to output.
For example, this is how you would potentially label a layer to output as a JPEG:
Photograph01.webp50% (can define quality from 1% to 100%) Photograph01.webp5 (can define quality from 1 to 10) 300px x 300px Photograph01.webp75% (size can be defined in any type of units: in, cm, etc) 200% Photograph01.webp75% (a percentage as a prefix will define size, suffix)
Photograph01.webp24 (24 for a.webp 24) 175% Photograph01.gif (this will output a GIF at 175% size) Photograph01.webp8 (8 for a.webp 8) 50% Photograph01.webp24 (this will output a.webp-24 at 50% size)
Once you’ve labeled your layers, then you go to File > Generate > Image Assets. This will automatically output your images. If you have saved your Photoshop project file (PSD), files will be save alongside of your project. If you haven’t saved your project, files will be saved in a new folder on your desktop.
Ignored Feature #09 Copy Merged
One great feature in Photoshop is the ability to perform a Copy Merged command. If you select multiple layers and then go to Edit > Copy Merged you can then paste the merged layers into any document as a single merged layer. Note: This feature can be a bit temperamental. Make sure that you are in RGB mode and you have layers selected. Beyond this, some individuals and companies have reported that this function can be grayed out regardless.
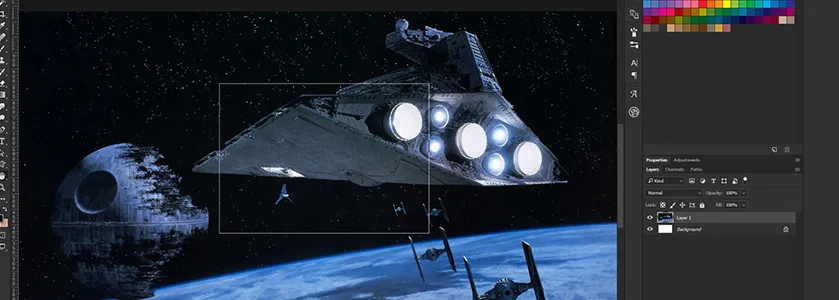
Ignored Feature #10 Temp Zoom
Temp Zoom allows you to quickly and temporarily zoom out to see your entire document with a guide that shows you what location you are in. To use this function, zoom in to any part of your document and then hold down the ‘H’ key. If you want, you can Left-Click and drag the white box around to zoom in to a different location.
Well, that’s my top ten ignored list! Explore Photoshop for yourself. You will likely find things you’ve overlooked or never seen before.
-
Address
915 Wilshire Blvd,
Suite 1800.
Los Angeles CA 90017 - Phone (888) 815-0604
- Email Show Email
In person v online training
In line with state protocals we have now fully resumed in person or classroom training.
Trainees still have the option of joining any of our classes remotely via Zoom webinar.
To attend any clasess remotely first add any class to your
cart and then click the small check box below the class. See screenshot below.

You will receive webinar login details for your training 2-3 working days before your class is due to commence.