Illustrator to After Effects: 3D Logo Workflow
By Kristian Gabriel, Adobe Expert/ACI
The ability to take a custom vector logo designed in Illustrator and bring it to After Effects for animation is invaluable. Animated network Idents, logos, lower thirds - the applications are endless. In this quick, down and dirty guide, let us look at the best ways to get your logos from Illustrator to After Effects and prep them to be animated in 3D.

Looking to learn Adobe Illutrator or After Effects?. We run some of the best Illustrator workshops and After Effects workshops in Los Angeles, plus our trainers can deliver onsite training right across the country. Obtain a quote for onsite Adobe training.
Step 01 - Prep & Save Your Logo In Adobe Illustrator
Before you can import your logo into After Effects, it needs to be prepped and saved in a proper vector format. This guide assumes that you have either designed your vector logo in Illustrator, or you have imported a vector logo into Illustrator. Note: Raster formats like JPEGs, TIFFs,.webps, GIFs and others cannot be used with this method.
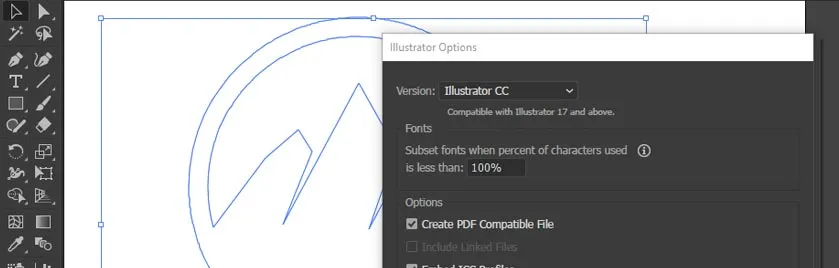
Once you’ve determined that your logo is finished, make it a contrasting color based on your After Effects composition background color. If your background is black, you can make your logo white and if your background is white, make your logo black. This is mainly so you can see your logo when imported into the timeline. You can always change color later. Now, all you need to do is simply save your logo as a native ‘.ai’ file.
This is the official Adobe Illustrator project file format and is the best file for bringing into programs like After Effects. As for the writing of this article, you can alternatively use EPS files (Encapsulated Post Script) and vector PDF files. Now, to save your logo, go to FILE > SAVE AS... and make sure Adobe Illustrator (*.ai), Adobe EPS (*.eps) or Adobe PDF (*.pdf) is selected. Now save your project file.
Step 02 - Importing & Prepping Your Logo for 3D
After saving your logo, open After Effects and use the standard FILE > IMPORT > FILE... to bring in your logo as an Adobe Illustrator file. At this point, you need an After Effects composition to put it in. If you already have one created, go ahead and drag your logo from the project window to the timeline. If you do not have a composition created yet, create one now at the size and framerate of your delivery project and then drag your logo from the project window to your timeline.
Now, to prepare your logo layer and make it ready for 3d you need to do two things:
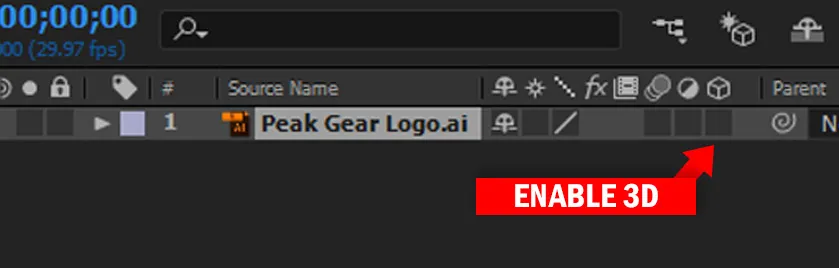
- Enable your logo layer for 3D in your timeline by clicking on the Enable 3D checkbox. And...
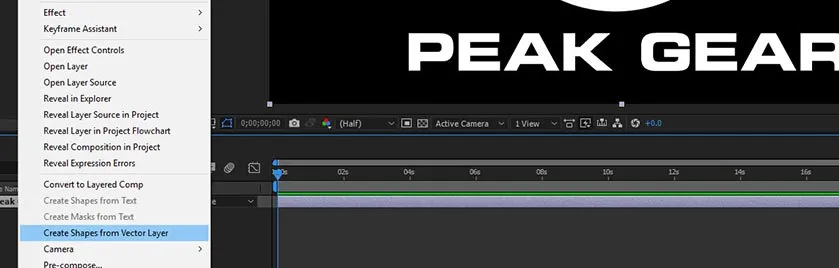
- Right-click your logo layer in the timeline and select CREATE SHAPES FROM VECTOR LAYER.
Create Shapes From Vector Layer properly converts your vector layer from a standard vector to a vector generated shape that After Effects can better manipulate, giving it 3D properties when you are in the right mode. You will now notice you have two (2) logos in your timeline. One shape layer version and one Illustrator .ai version that is disabled. At this point, you can delete the .ai layer to reduce clutter.
Step 03 - 3D Conversion
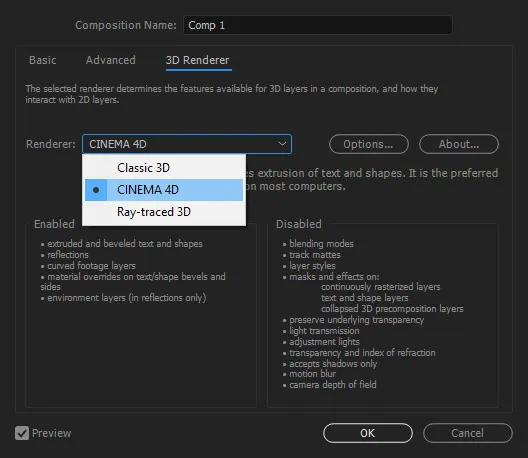
If you are in your composition or timeline window, use Command or Control + K or go to COMPOSITION > COMPOSITION SETTINGS... and click on the 3D Renderer tab as pictured above. By default, you will see that After Effects is in a mode called Classic 3D. Classic 3D is the traditional After Effects editing mode and primarily focuses on editing 2D Graphics in 2D or 2D Graphics in 3D space. Unfortunately, this will not allow you to work with “real” 3D objects without a 3rd party plugin like Element 3D. To remedy this, we have two additional rendering modes we can work with Ray-Traced 3D and Cinema 4D. Each of these rendering modes uses different math to enable the extrusions of 3D objects in 3D space. Both enable a lot of 3D functionality but each will disable a certain number of After Effects functions and features. For example:
- CINEMA 4D Mode WILL DISABLE: blending modes, track mattes, layer styles, masks and effects on continuously rasterized layers, text and shape layers and collapsed 3D precompositions. It will also disable underlying transparencies, light transmission, adjustment lights, transparency and index refraction, the ‘Accepts Shadows Only’ function, motion blur and camera depth of field.
- RAY-TRACED mode WILL DISABLE: blending modes, track mattes, layer styles, masks and effects on continuously rasterized layers, tet and shape layers and collapsed 3D precompositions. Ray-Traced mode will also disable underlying transparencies.
Cinema 4D is the newer renderer and offers a generally faster and easier solution to you rendering process in some situations. Choose Cinema 4D as the renderer and then click ‘OK’.
Step 04 - 3D Logo Details & Additional Tweaks
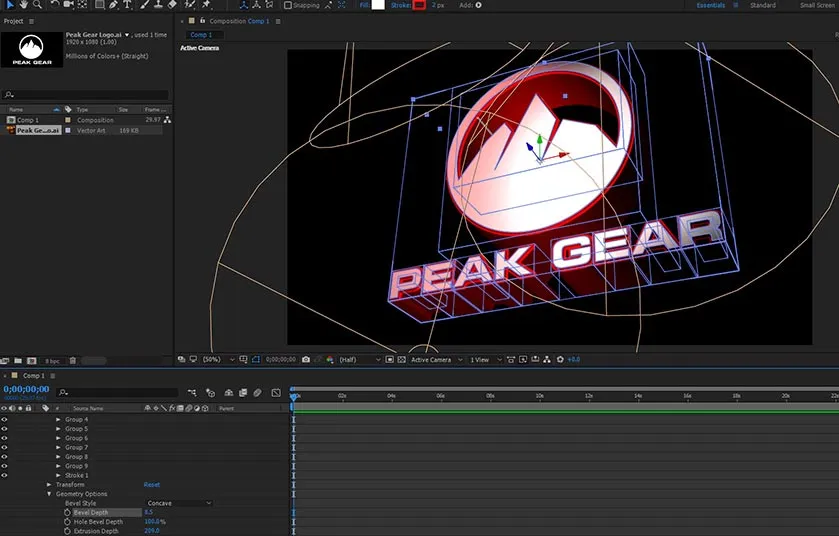
Before you start making your logo 3D, add a simple Point or Spot Light so that you can see the extrusion properly. That’s it! Now, to extrude your logo in 3D space, reveal the Geometry Options under your 3D logo layer and increase Extrusion Depth. Other things you can play with is the type of Bevel Styles and Bevel Depth to make the edges of your text a little more interesting. If you want change color of the individual letters or pieces of your logo - go into your shape layer’s Content Properties and you will be able to tweak color and a whole lot of other things!
Alternatives to bringing in logos from Photoshop and other Apps
The following are alternative methods you can use if your logo was created in Photoshop, CorelDraw or any other graphic application.
- PHOTOSHOP METHOD: If you have your logo in Photoshop, convert your logo to Paths (you can use the Make Work Paths feature) and then you can go to EXPORT > PATHS TO ILLUSTRATOR... This will export your vector paths into an Illustrator Project file. Then you can fill paths and generally tweak your vector logo until its ready for saving out to After Effects.
- OTHER APPS: Using other apps like Corel Draw - you can export into an .EPS file for immediate import into After Effects or even a .CDR (Corel Draw file) or .SVG (Scalable Vector file) - but these formats will have to be loaded into Illustrator first and resaved as an .ai, .eps or .eps file.
Hopefully this wasn’t too crazy to absorb! Remember that if you want to delve deeper into these subjects and more, check out Training Connection’s After Effects, Illustrator and Photoshop classes and boot camps and good luck with your own projects!
