Pattern Madness In Adobe Illustrator
By Kristian Gabriel, Adobe Expert/ACI
It wasn't that long ago that creating patterns was a tedious affair. There were always little applications that could speed things up, but most did not give you adequate creative control. Most pattern creation software was raster or pixel based, which produced some nice patterns, but limited you if you wanted to scale those patterns. Fast forward to the present and we have some great (and easy) pattern creation features in Adobe Illustrator. Coupled with the vector power of Adobe, the pattern maker in Illustrator is a wonderful addition to what is already an amazing application.

Need to learn Adobe Illustrator? Join one of our small Adobe Certified Illustrator classes? We trainers are talented graphic designers. Public classes offered in Los Angeles. Onsite training available country wide. Obtain a quote for onsite Illustrator training.
Methods To The Pattern Madness in Illustrator
There are several methods to create patterns in Illustrator, but the main ones are: the Illustrator Pattern Maker and manual design. Manual design involves extra work in manipulating and reflecting parts of a design to create a seamless pattern. This takes a lot of know-how in how different types of patterns work. Hardcore pattern makers still use these methods today. The other method is, of course, using Illustrator's Pattern Maker which is a full-featured tool that facilitates the pattern making process through easy to use drop down menus, checkboxes and an amazing way to preview your new patterns. Let's explore Illustrator's Pattern Maker and give you a foothold on one of the most powerful tools in this vector application.
Creating Your First Pattern
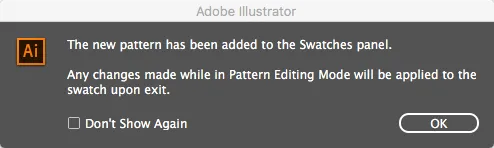
To create a pattern, all you need to do is go to OBJECT> PATTERN > MAKE to enter Pattern Editing Mode. This will instantly bring up a notification dialogue saying that it has added your pattern to the Swatches panel. This will be a pattern "placeholder" if you haven't created any graphics yet.
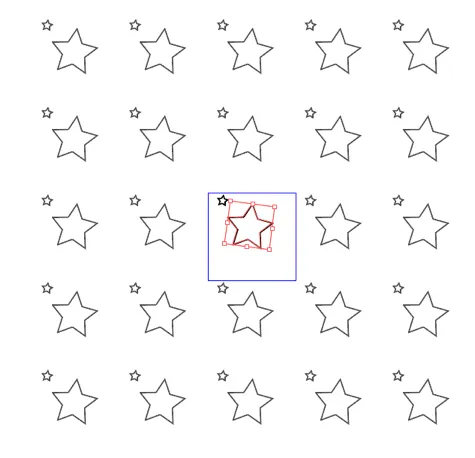
The dialogue also tells you that any modifications in the Pattern Editing Mode will dynamically be added to your pattern. At this point, just hit OK. Your screen should essentially be empty with a small blue box in the middle of your document and the PATTERN OPTIONS dialogue box with options to tweak your pattern. That small blue box is your pattern. At this point, anything you draw or place in that blue box, will create and add to that pattern. Everything outside of the blue box is a repeat of your live pattern and can give a you an idea of how your pattern looks tiled. I just used the Star Tool to draw two stars with the tile, however, you can use any Shape Tools, Brush Tools, Symbols and pretty much any tool to contribute to the creation of your tile so have at it!
Tweaking Your Pattern
Now that you know how to create a pattern, now it's time to tweak your pattern! To do that, you need to use the Pattern Options panel in Pattern Editing Mode. When you enter Pattern Editing Mode, this panel should automatically pop up. If it doesn't, click DONE in the upper left hand corner of the window and then reopen your pattern in Pattern Editing Mode by Double Clicking on your pattern in the Swatches Panel.
The Pattern Options panel has many options for tweaking your pattern and ways of tweaking the preview of your tile. Let's step through the different options that will really take your pattern to the next level!
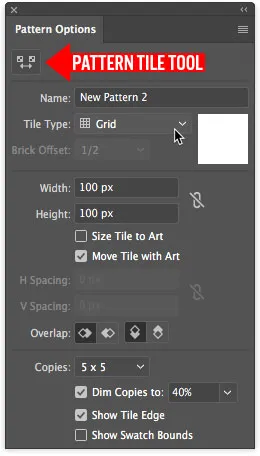
In the upper part of the panel, there is a button that activates the Pattern Tile Tool. This tool allows you to resize your tile by dragging the corners of your tile. This tool also allows you to manually adjust the spacing if you have chosen to make your tile a brick pattern.
The Name input box allows you to name your pattern, though you can change this at any time in your Swatches panel. The feature is the Tile Type. Tile type gives you five tiling layout options.
- Grid: This the standard 2-dimension tiling option
- Brick By Row: This will offset every other line of tiles horizontally
- Brick By Column: This will offset every other line of tiles vertically
- Hex By Column: This offsets your tiling layout based on a Hexagonal pattern (by Column/Vertical)
- Hex by Row: This offsets your tiling layout based on a Hexagonal pattern (by Row/Horizontal)
Brick Offset affects Brick By Row and Brick By Column and determines by how much tile width and height the centers of tiles in adjacent rows and columns are out of vertical and horizontal alignment.
Width and Height is a more precise way of dialling in a specific width and height of your tile.
Size Tile To Art will resize your tile to fit the size of your artwork.
Move Tile with Art will move your tile box when you move your graphics content within your pattern.
H.Spacing/V.Space adjusts the space between rows and columns.
Overlap determines which tiles appear in front when overlapping.
Copies will extend the tiling preview area to give you more tiles.
Dim Copies is another feature that allows you to change the transparency of the preview tiles, allowing you to focus on your primary tile for a better, less confusing layout when designing your tile.
Show Tile Edge displays a box around the tile.
Show Swatch Bounds shows the actual portion of the tile that is used to repeat the pattern.
Designing A Simple Pattern
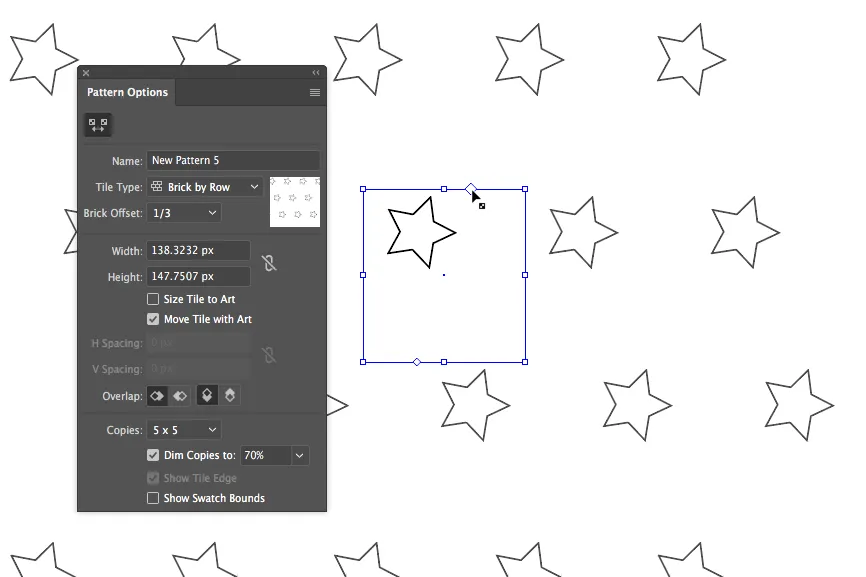
As stated earlier, any type of artwork can make up the contents of your pattern. If you are an illustrator you can even turn your hand-drawn patterns and drawings into tiles as well. The options are endless. Let's go ahead a create a simple creative pattern like the one above. Once again, feel free to modify and experiment.
Do the following:
- Create a new illustrator document
- Create a perfect circle with fill and stroke (Fill R: 255 G: 0 B: 255, Stroke: R: 251 G: 176 B: 59)
- Go to Effects > Distort & Transform > Pucker & Bloat. Then, set the slider to -55%
- Select your artwork and then go to OBJECT > PATTERN > MAKE
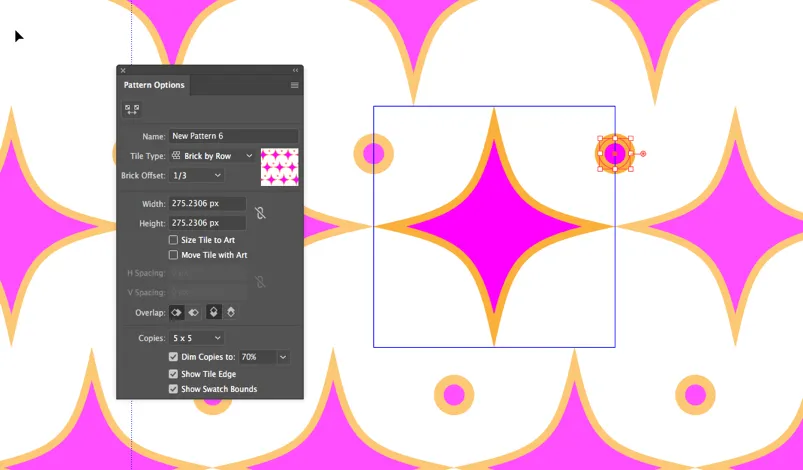
- In the Pattern Editor Mode, set Tile Type to Brick By Row (Brick Offset 1/3)
That's it! Feel free to copy any additional properties in the picture above. I also added one small circle as you can see in the upper right corner of the tile box. Before you draw an additional element like this, first deselect Size Tile to Art. If you don't, the tile box will keep expanding every time you manipulate the size of your artwork within. Now go and make some cool patterns!
All images created and composited by Kristian Gabriel using Adobe Stock, Techsmith Snag-It and Adobe Photoshop.
