Workflow Efficiency with Tool Presets in Adobe Photoshop
By Kristian Gabriel, Adobe Expert/ACI
Working on Photoshop projects can be tedious and many times very challenging. No matter what level of Photoshop user you are, useful shortcuts and time-saving features are a must if you are to keep your sanity. One such useful feature is called Tool Presets. Tool Presets can be created using any tool from your Tool Panel and can greatly speed up your whole workflow by giving you access to custom tools setup by you. Custom brushes, healing tools, erasers and selection tools like the Lasso tools, Quick Selection or the Magic Wand tools are just a few of the many tools you can use.

Looking to learning Adobe Photoshop - why not join one of our Adobe Certified Photoshop training classes in Los Angeles call us on 888.815.0604
Tool Presets are part of a bigger collection of presets that can be managed, organized and saved on a flash drive, hard drive, emailed or uploaded to the cloud. One great benefit is that most of the presets you can output in Photoshop have almost no significant size requirements. Aside from Brush and Pattern Presets, all presets are merely a set of instructions for Photoshop to re-create. These presets are known as Generated Presets. They are not attached to any physical media and use the features and functionality already existing in any standard Photoshop project to re-generate your custom presets when loaded. Brushes and Patterns have embedded images within them, so depending on the size of the pattern or brush, the size requirements can potentially be huge. Tool Presets are generated presets and the following article is a focus on how to create them and improve your workflows.
The Tool Preset Panel(s)
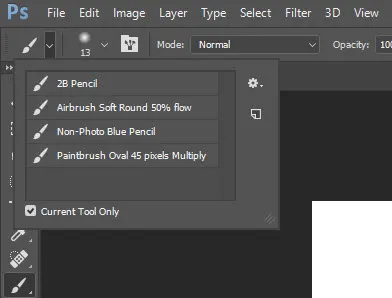
There are two locations in Photoshop that allow access to your Tool Presets. One is conveniently located in the upper left corner of your OPTIONS BAR. Depending on what tool you currently have selected, your Tool Presets will give you custom presets for that tool. If you click on a tool and notice that it has no presets, this is perfectly normal. By default, some tools have presets and some do not. It's then up to you to create presets you think would be useful to you. Note: Be careful when choosing the Brush Tool. The Brush Tool panel and the Tool Preset can look very similar. Just remember that the Tool Preset panel is the one the furthest to the left, the first feature on the Options Bar.
The second location for your Tool Presets is the official Tool Preset Panel at WINDOW > TOOL PRESETS. Both panels are almost identical and offer you the ability to create Tool Presets and then manage the lists of tools you have created. You will notice that there is a check box labeled Current Tool Only at the bottom of the panel. If this is Deselected, it will show you All Tool Presets. If this is Selected it will only show you presets of the current tool you have selected.
Creating Preset Tools
Luckily, Tool Presets are extremely easy to create!
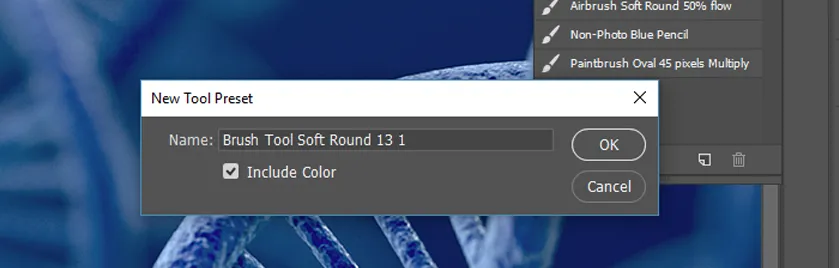
- Step 1 - Select any tool and adjust it any way you wish. Example: You could select the brush tool, make it a round brush and give it a size of 50 px, and 0% Hardness (feathering the edge of the brush).
- Step 2 - Go to either of the Tool Preset locations and click on the Create New Tool Preset button (the folded Post-It Note like button on the right side of the dialogue panel) Note: You will notice that in the Create New Tool Preset dialogue panel, there is an option to 'Include Color'. This will record the current foreground color you have selected for your brush to use.
- Step 3 - Now that you've created a Tool Preset, all you need to do is come back to your Tool Preset and click on the custom tool of choice. That's it!

Managing Preset Tools
Once you have created lots of tools, it's time to get organized.
What if you wanted to save your tools to a hard drive or send your tools via email to a client, a fellow artist or yourself?
The Preset Manager is a way of organizing your Tool Presets into sets or volumes.
To get to your Preset Manager, go to the right side of your Tool Preset dialogue panel and click on the little 'Rotor' icon or the Panel Menu icon (Hamburger Menu). This is the official setting for your presets panel and a way to access the Preset Manager. Once you click on the icon, select PRESET MANAGER. From the Preset Manager, you now have some choices on the right side of the panel. If you select DONE it will close the dialogue panel. LOAD will allow you to load a previously saved Tool Preset file. SAVE SET allows you save individual or groups of tools in a set as a Preset file (extension .tpl). To output groups of tools, just use Shift or Control/Command keys to select a range or various Tools to output. Then select SAVE SET and save to a location on your computer. Click any of your presets and select RENAME to rename that preset. The last button is just a DELETE button that allows you to delete presets.
To re-arrange your tools into a different display order, select one or many Tool Presets and drag them into any order you desire. Note: By default, Photoshop will save your Presets files into a default Preset folder on your computer. This location differs between Mac and Windows PC systems. For easier access, save to an easily accessed location like a hard drive or a convenient place on your computer.
Other Time-Saving Presets
While Tool Presets are fantastically useful, other features in the Presets Manager can be useful as well!
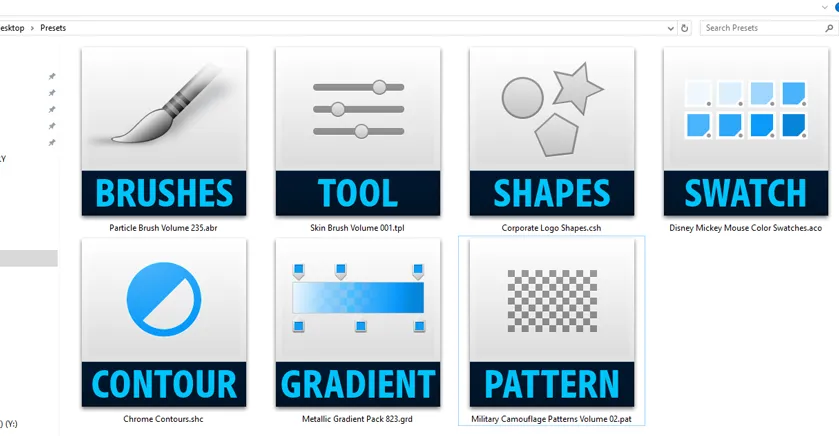
The ability to save Brush Presets is powerfully convenient. Remember that, in Photoshop, brushes are not just standard artistic painting brushes, they can also be like stamps, allowing you to "stamp" complex art, both abstract and photo-realistic elements, in one click.
Shape Presets can be used to create a library of abstract elements that are frequently used like logos, parts of logos, vector shapes, pictures and other common abstract elements. Swatch Presets are used to organize and store frequently used colors and color sets. Contours Presets are used to change the distribution of colors in an effect. This can be used to create complex photo-realistic textures like chrome and other organic and non-organic materials. Pattern Presets are used to organize repetitive patterns for backgrounds, texturing and beyond.
See how useful Presets are? And that's not even all the presets in Photoshop. Features like Curves, Levels and others can also save their own presets as well. Now you have no excuse in getting your creative work done fast.
All images created and composited by Kristian Gabriel using Adobe Stock, Techsmith Snag-It and Adobe Photoshop
Photoshop Student Testimonials
-
Address
915 Wilshire Blvd,
Suite 1800.
Los Angeles CA 90017 - Phone (888) 815-0604
- Email Show Email
In person v online training
In line with state protocals we have now fully resumed in person or classroom training.
Trainees still have the option of joining any of our classes remotely via Zoom webinar.
To attend any clasess remotely first add any class to your
cart and then click the small check box below the class. See screenshot below.

You will receive webinar login details for your training 2-3 working days before your class is due to commence.